Forms
Forms and submissions
Build forms for your store pages, choose who is emailed when a customer fills one in, and follow every submission from arrival to completion, including spam.
Forms let customers get in touch with a store straight from its store page, for example to ask a question or request a quote. When a customer sends a form, Shoppy Connect records it as a submission, emails the store and the customer, and keeps a full history so nothing gets lost.
This guide covers:
- Forms: creating a form, building its fields, and choosing where it appears.
- Notification emails: what the store receives when a form is sent.
- Submissions: following each submission, and handling spam and failures.
How it works
Each time a customer sends a form, the submission goes through these steps in the background:
- Functions ran: any custom functions add extra information to the submission.
- Quote created: the submission is saved as a quote.
- Store email sent: the store gets the notification email.
- Customer email sent: the customer gets an email to confirm.
- Completed: every step has finished.
Submissions that look like spam are stopped before the first step, so no quote is created and no emails are sent. You can still release them if they turn out to be real. See Spam.
Forms
Go to Settings › Forms to see all of your forms.
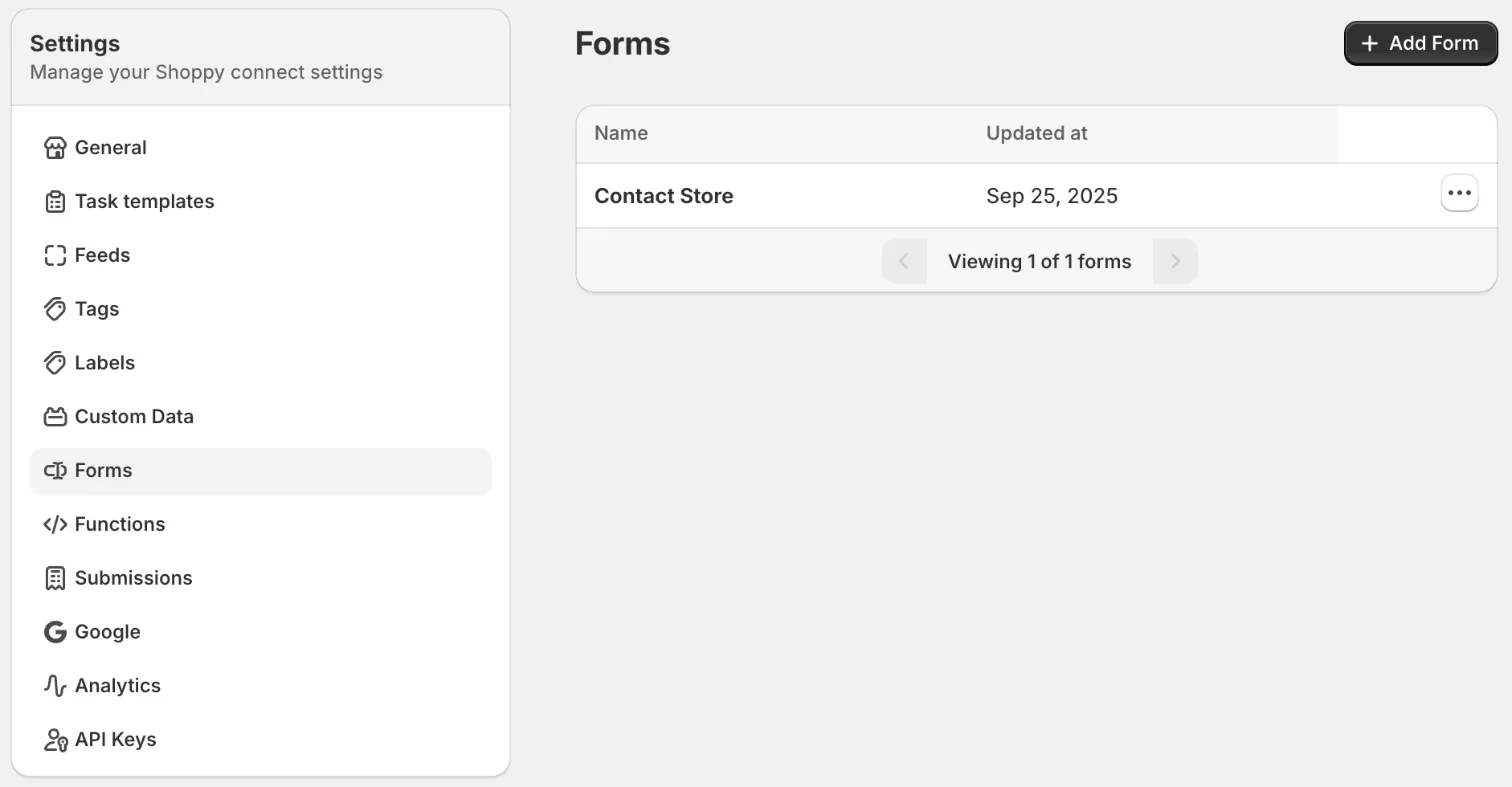
- Click a form’s name to open it.
- Click Add Form to create a new one.
- Use the ⋯ menu on a row to delete a form.
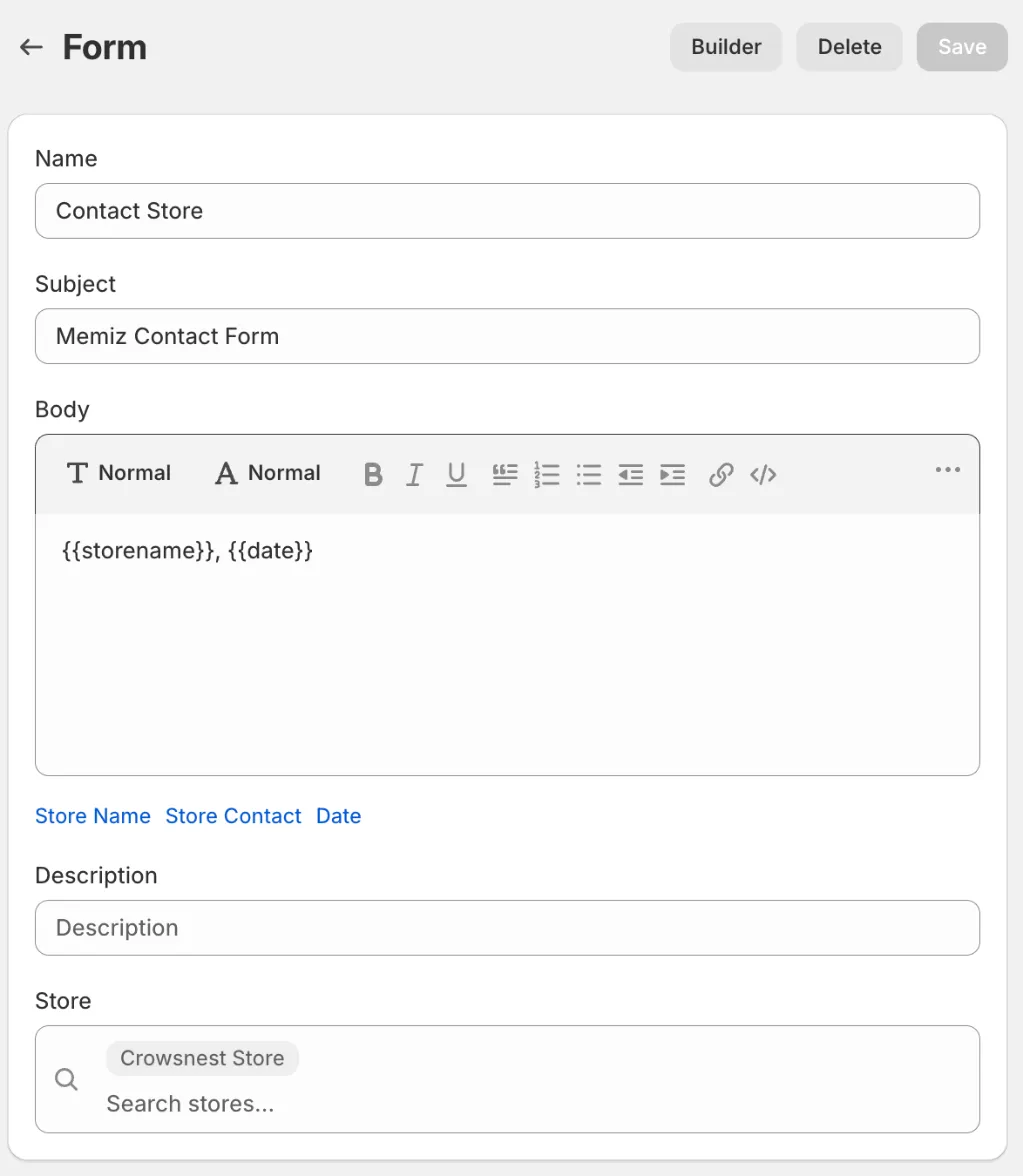
Opening a form shows its name, notification email, and the store it belongs to. Click Builder to change its fields and settings.
The form builder
The builder is where you design the form customers see.
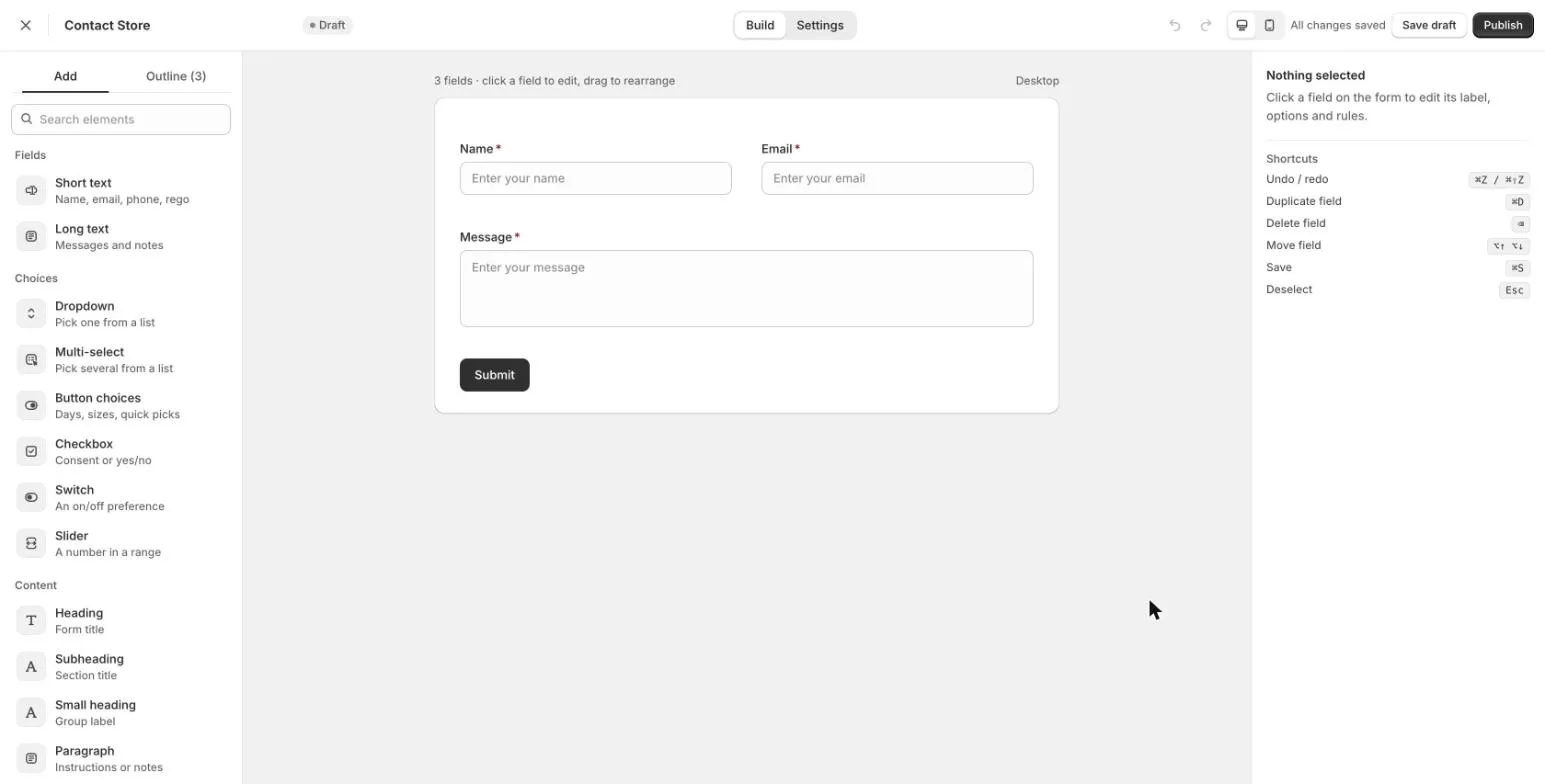
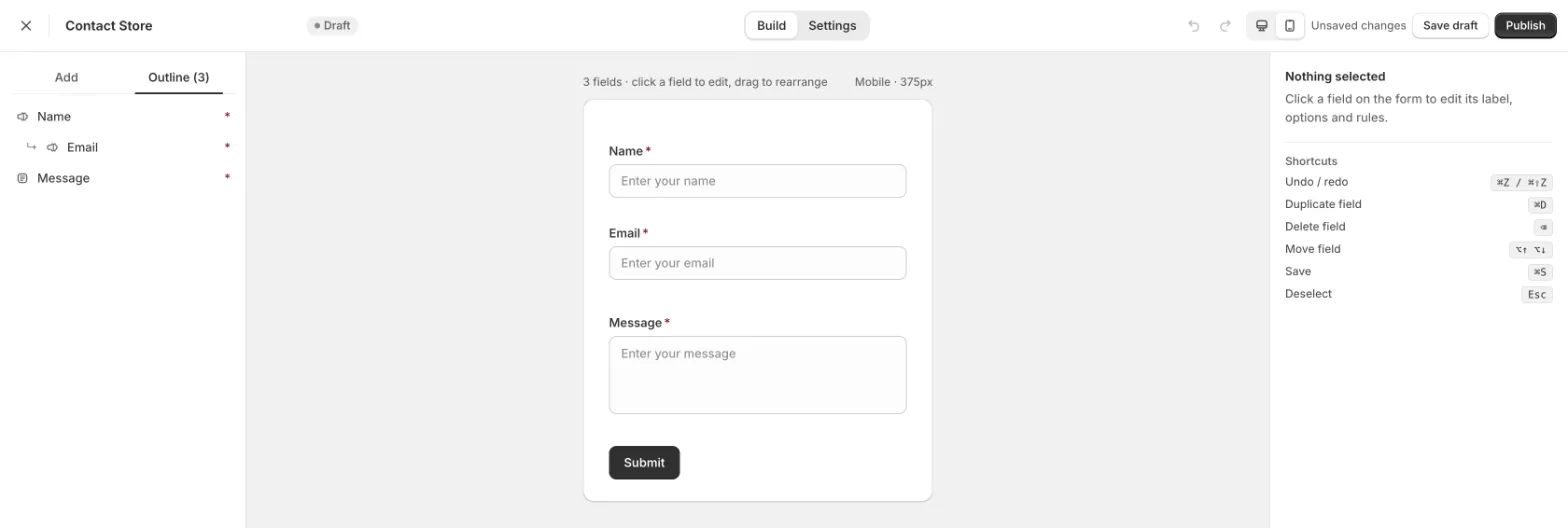
The builder has three panels:
- Left: the elements you can add (Add), and a list of the fields already on the form (Outline).
- Middle: a live preview of your form. Click a field to edit it, or drag it to move it.
- Right: the settings for the selected field, or a list of keyboard shortcuts when nothing is selected.
The bar across the top shows the form’s name and status, such as Draft, and has these controls:
- Build and Settings switch between designing the form and its settings.
- Undo and Redo.
- Desktop preview and Mobile preview, to check how the form looks on each.
- Save draft saves your work without changing the live form.
- Publish makes your changes live on your store pages.
Add fields
In the Add panel, click an element to add it to the end of the form, or drag it to where you want it. Use Search elements to find one quickly.
| Group | Element | Use it for |
|---|---|---|
| Fields | Short text | A name, email address, phone number, or rego. |
| Long text | Messages and notes. | |
| Choices | Dropdown | Picking one option from a list. |
| Multi-select | Picking several options from a list. | |
| Button choices | Quick picks, such as days or sizes. | |
| Checkbox | Consent, or a yes or no answer. | |
| Switch | An on or off preference. | |
| Slider | A number in a range. | |
| Content | Heading | The form title. |
| Subheading | A section title. | |
| Small heading | A label for a group of fields. | |
| Paragraph | Instructions or notes for the customer. | |
| Divider | A visual break between sections. |
Edit a field
Click a field on the form to select it. A toolbar appears above it, and its settings open on the right.
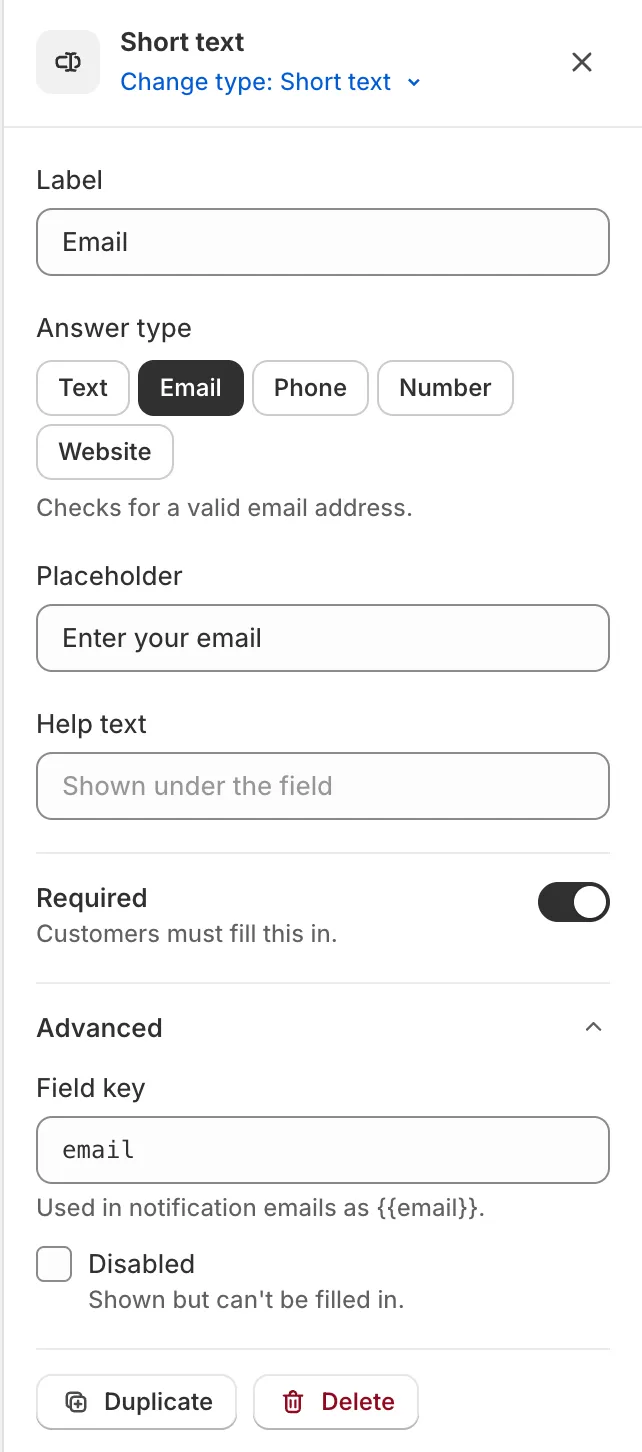
| Setting | What it does |
|---|---|
| Change type | Turns the field into a different element, for example from Short text to Long text. |
| Label | The question the customer sees. |
| Answer type | For Short text: Text, Email, Phone, Number, or Website. Shoppy Connect checks the answer matches, for example a valid email address. |
| Placeholder | Example text shown in the empty field. |
| Help text | A hint shown under the field. |
| Required | Customers must fill this in before they can send the form. |
| Field key | Under Advanced. The name used to insert this answer in the notification email, for example {{email}}. |
| Disabled | Under Advanced. The field is shown but can’t be filled in. |
The toolbar above a selected field lets you:
- Move up and Move down.
- Stack fields: place the field next to the one before it, or back on its own row. For example, the Contact Store form shows Name and Email side by side.
- Duplicate the field.
- Delete the field.
The Outline tab lists every field in order, with required fields marked with a red *. Fields shown side by side appear indented under the field they sit next to.
Keyboard shortcuts
| Action | Mac | Windows |
|---|---|---|
| Undo / redo | ⌘Z / ⌘⇧Z | Ctrl+Z / Ctrl+Shift+Z |
| Duplicate field | ⌘D | Ctrl+D |
| Delete field | ⌫ | Backspace |
| Move field | ⌥↑ / ⌥↓ | Alt+↑ / Alt+↓ |
| Save | ⌘S | Ctrl+S |
| Deselect | Esc | Esc |
Start from a template
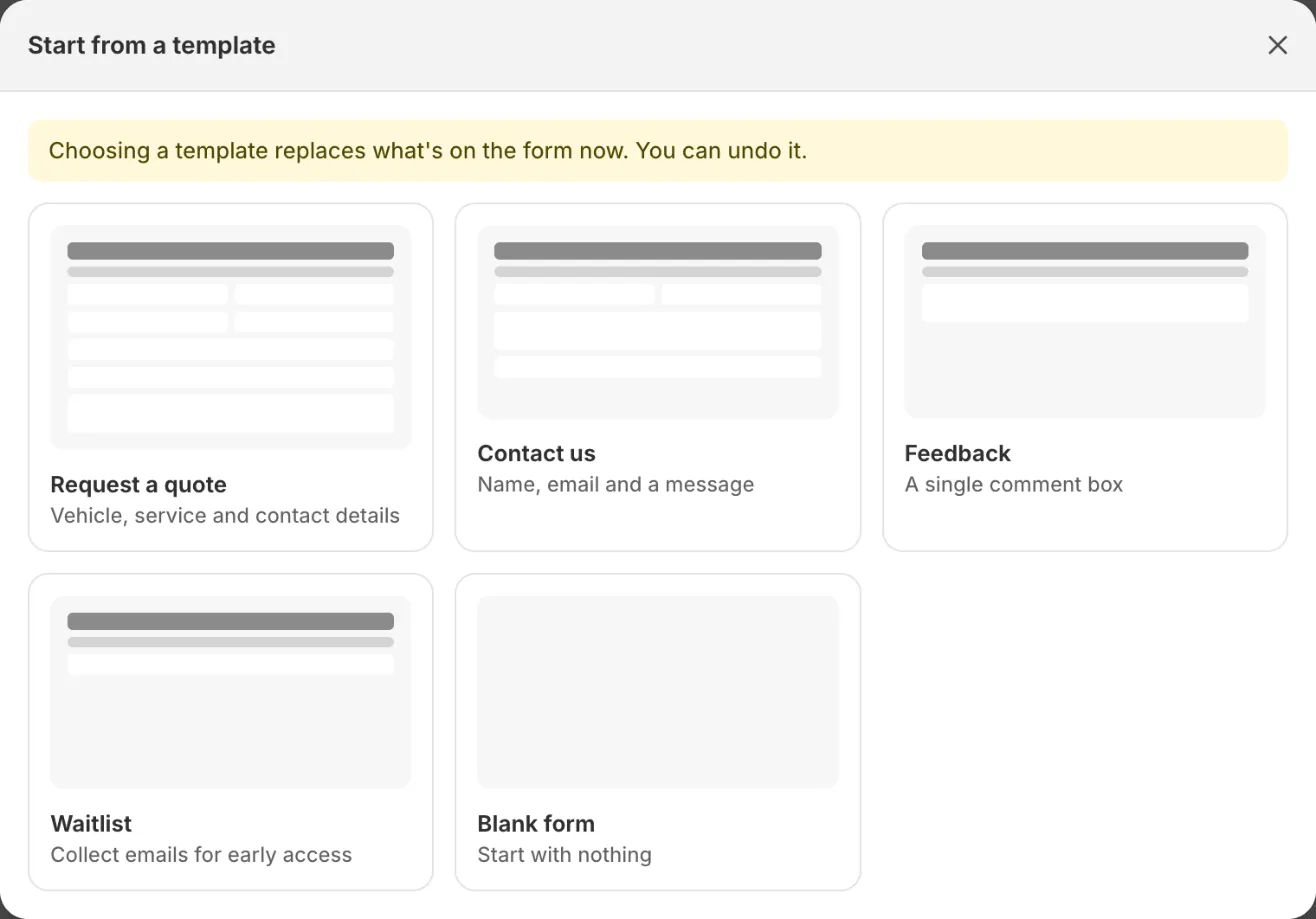
To save time, click Start from a template at the bottom of the Add panel.
| Template | Includes |
|---|---|
| Request a quote | Vehicle, service, and contact details. |
| Contact us | Name, email, and a message. |
| Feedback | A single comment box. |
| Waitlist | An email field to collect early sign-ups. |
| Blank form | Nothing, so you can start from scratch. |
Choosing a template replaces everything on the form. If you choose one by mistake, click Undo.
Form settings
Click Settings at the top of the builder.
- Details: the form’s Name, and a Description that only your team sees.
- Notification email: see Notification emails.
- Stores: tick the stores whose store pages should show this form. Use Select all to add it to every store, or the search box to find one.
- Delete form: see Delete a form.
You can also choose a store’s forms from the Forms card on the right of its Details tab. See Managing stores.
Publish your changes
When you’re happy with the form, click Publish. Until then, the form shows as Draft and you can click Save draft to keep your work.
If you try to leave the builder with unsaved changes, Shoppy Connect asks you to save first. Click Save draft or Publish, or leave the page to discard your changes.
Delete a form
Use Delete form in the builder’s Settings, or the ⋯ menu on the Forms list.
Important: Deleting a form removes it from every store and permanently deletes all of its submissions and quotes. To stop using a form for a while, untick its stores under Stores instead.
Notification emails
Every time someone sends the form, the store is emailed. Set up this email in the builder’s Settings, under Notification email.
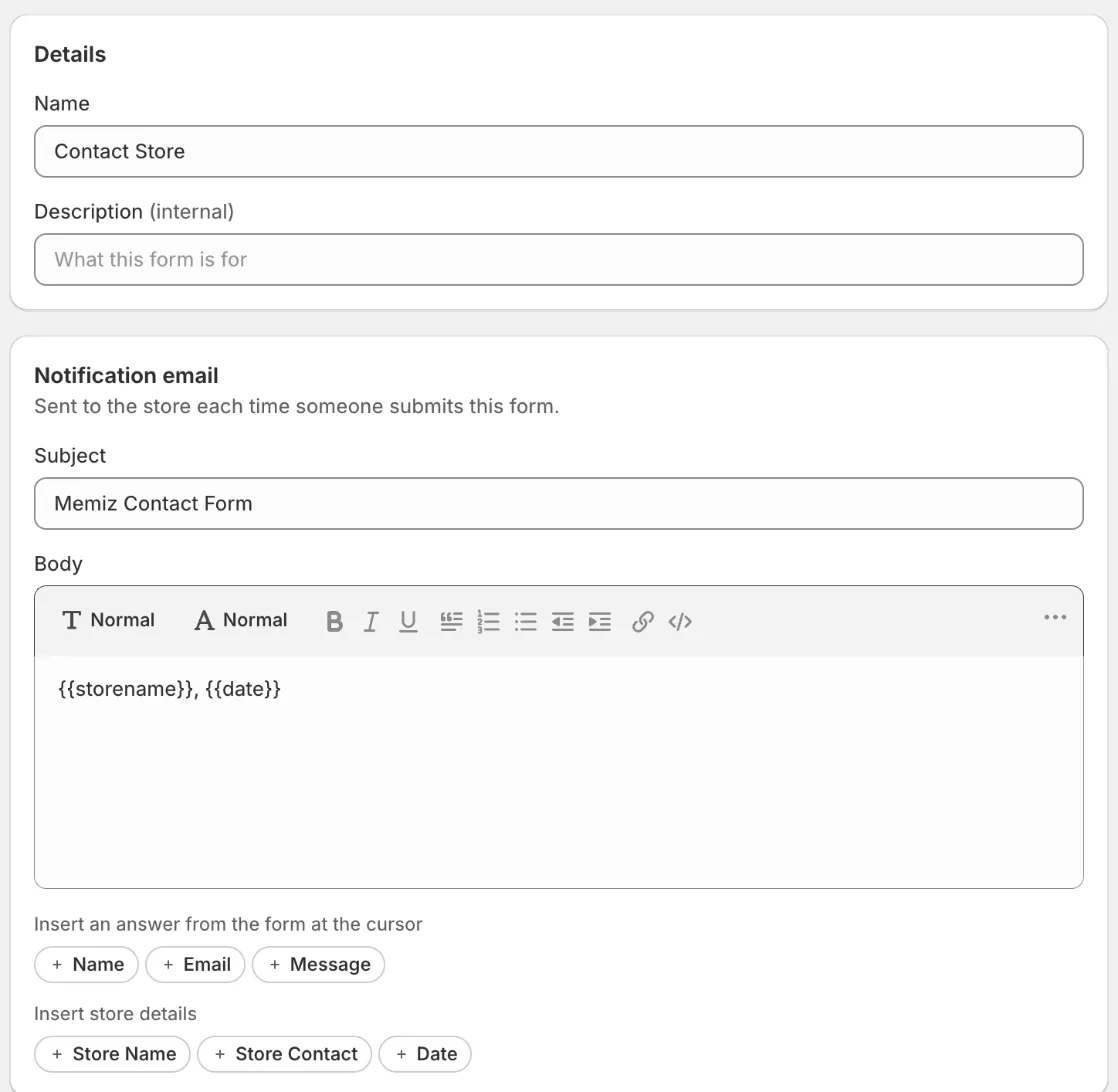
- Enter a Subject, for example “New enquiry from your store page”.
- Write the Body. You can format it with headings, bold text, lists, and links.
- Insert information where the cursor is:
- Insert an answer from the form: one button for each field on the form, such as Name, Email, or Message.
- Insert store details: Store Name, Store Contact, and Date.
- Click Save draft or Publish.
Inserted information appears as a placeholder in double curly brackets, such as {{storename}} or {{email}}, and is replaced with the real values when the email is sent. A field’s placeholder matches its Field key.
The email to the customer, and the address it’s sent from, are set under Settings › General › Email Settings. There you can also add BCC Emails, so a copy of every customer email goes to your team. See Set up your organisation.
Include the customer’s name, email, and message in the notification, so the store can reply without opening the dashboard.
Submissions
Go to Settings › Submissions to see every form your customers have sent.
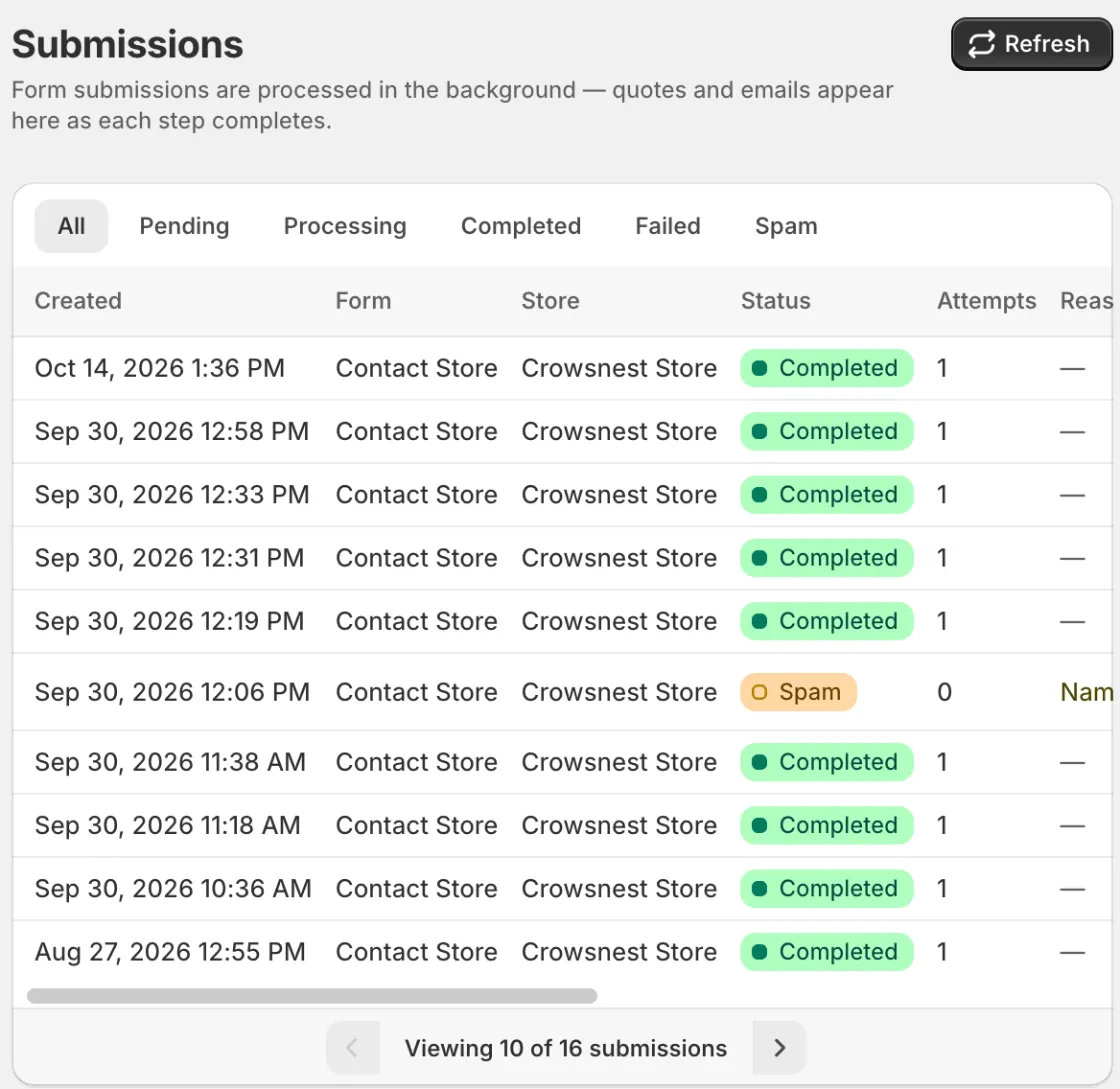
Each row shows:
- Created: when the customer sent the form.
- Form and Store: which form, on which store page.
- Status: where the submission is up to. See the table below.
- Attempts: how many times Shoppy Connect has tried to process it.
- Reason: why a submission was flagged as spam or failed.
Submissions are processed in the background, so a new one may take a moment to finish. Click Refresh to see the latest status.
| Status | What it means |
|---|---|
| Pending | Received and waiting to be processed. |
| Processing | Being processed now. |
| Completed | Every step finished: the quote was created and both emails were sent. |
| Failed | A step couldn’t be completed. Check the Reason column and the submission’s details. |
| Spam | Looked like spam, so it wasn’t processed. No quote was created and no emails were sent. |
Use the filters at the top of the table to see only submissions with one status.
See a submission’s details
Click a submission to open it.
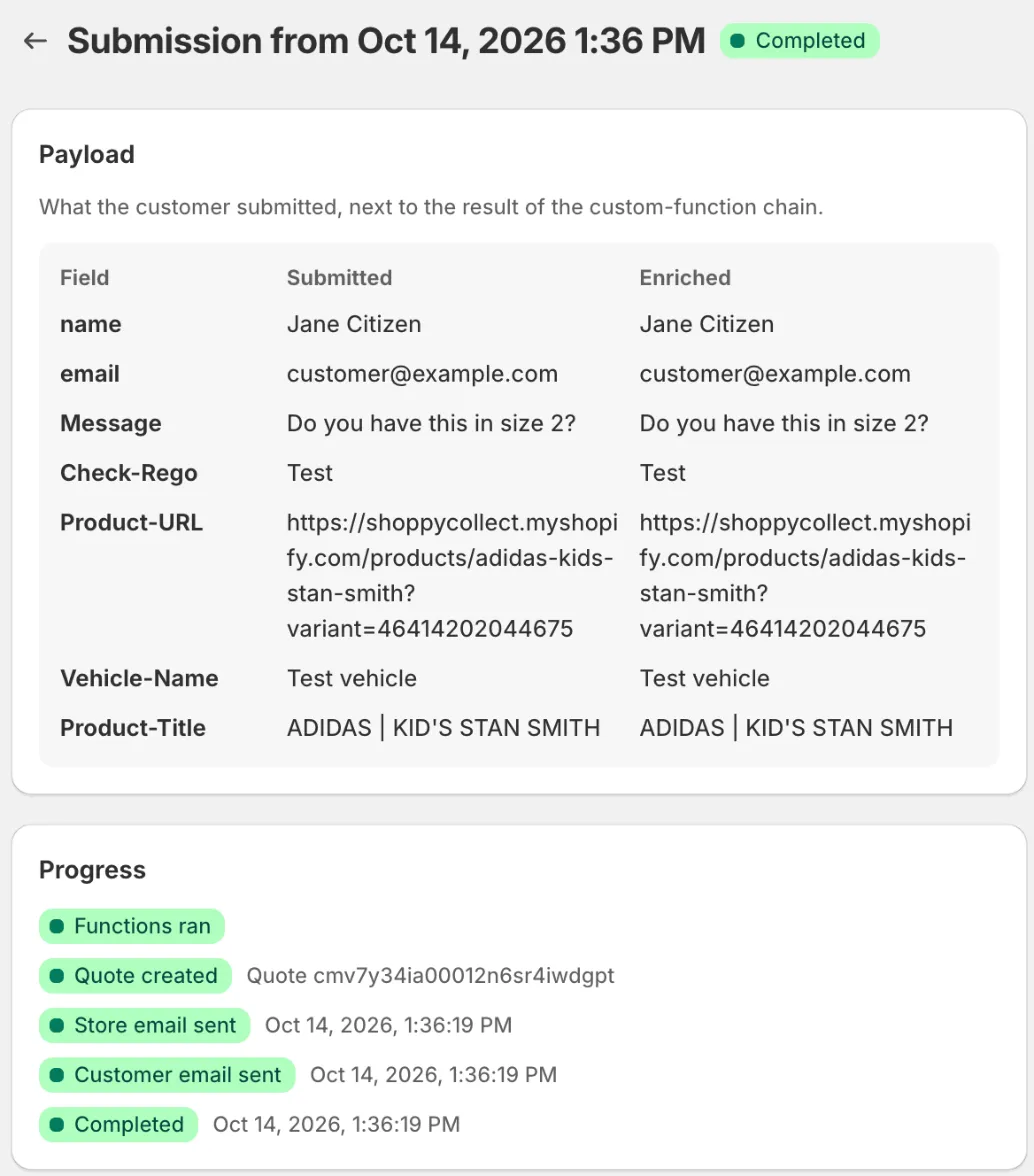
- Payload: what the customer entered, field by field. The Submitted column is what they typed. The Enriched column is the same submission after any custom functions have run.
- Progress: each step, with the time it finished. Use it to check that the store and the customer were emailed.
- Details: the form, store, quote, the customer’s IP address, the number of attempts, and when the submission was created and last updated.
Spam
Shoppy Connect checks every submission for signs of spam before processing it, for example a name that contains numbers, or a message with no letters. These submissions get the Spam status, and the Reason column says what was found.
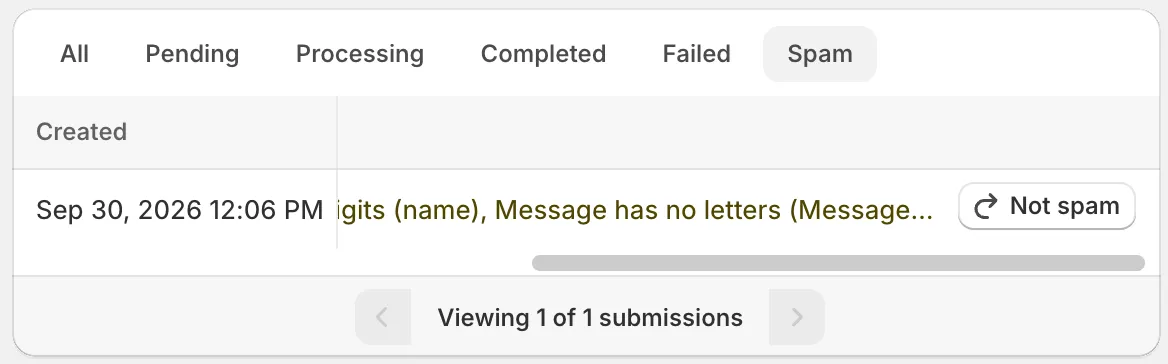
Open a spam submission to see all of the reasons:
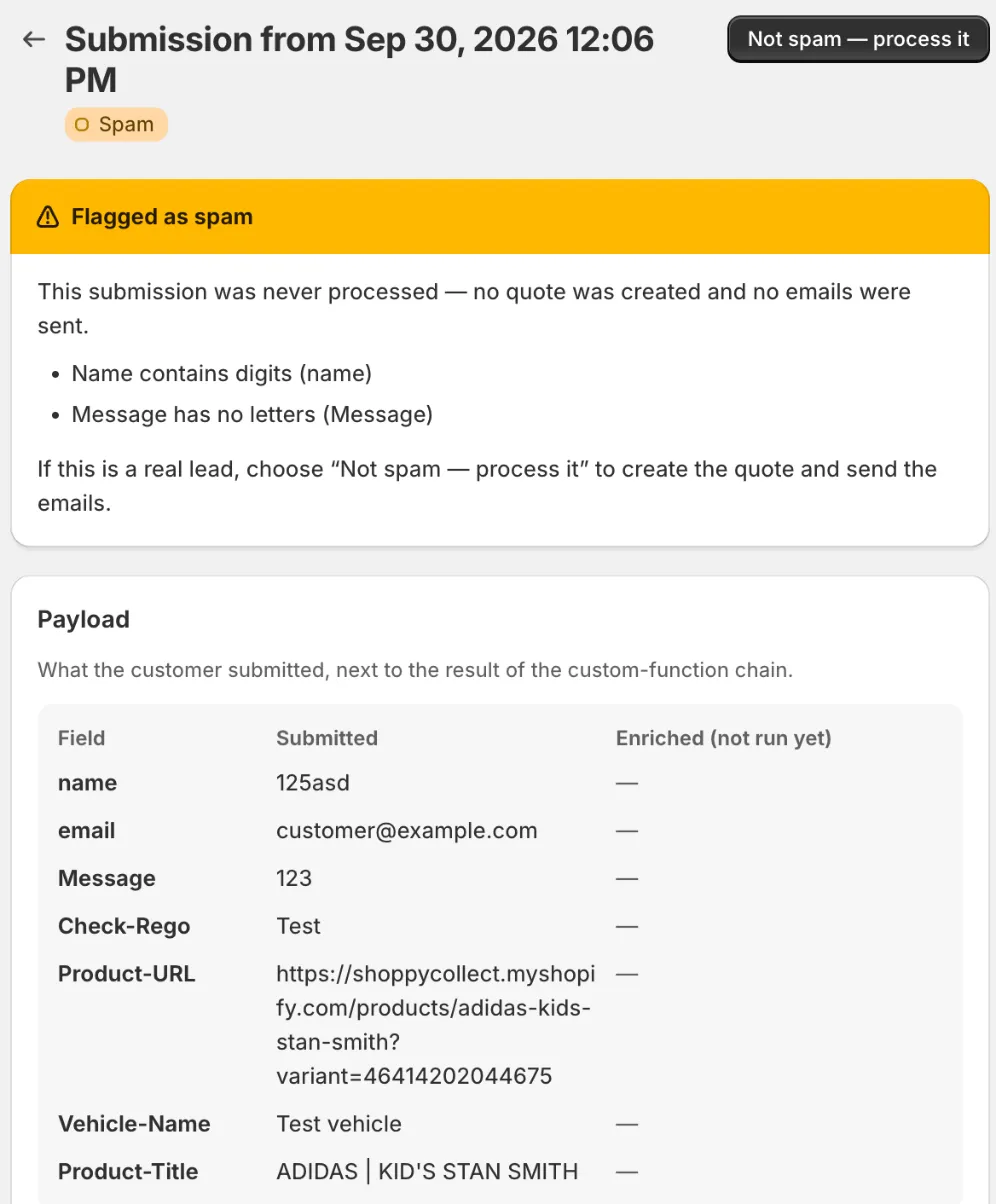
If it’s a real customer:
- Click Not spam on the row, or Not spam — process it on the submission.
- Shoppy Connect processes the submission as usual: the quote is created, and the store and the customer are emailed.
Check the Spam filter every week or so, so real customers aren’t left waiting for a reply.
Custom functions
Custom functions are short pieces of JavaScript that run when a customer sends a form. They can look up information in other systems and add fields to the submission before the quote is created and the emails are sent.
Set them up under Settings › Functions. They’re usually set up by a developer.
Tips
- Start from the Contact us template, then add only the fields you really need. Shorter forms get more replies.
- Make the email field Required and set its Answer type to Email, so you can always reply.
- Use Help text to explain anything unusual, such as what a rego number is.
- Check your form in Mobile preview before you publish. Most customers use their phone.
- Send yourself a test submission from a store page after publishing, and check it reaches Completed.
Troubleshooting
A store didn’t get the notification email. Open the submission and check Progress. If Store email sent isn’t ticked, check the Status and Reason. Also check that the store’s Email is set on its Details tab, and look in the store’s spam folder.
A real customer’s message was marked as spam. Open it from the Spam filter and click Not spam — process it.
The form doesn’t appear on a store page. Check that the form is published, that the store is ticked under Stores in the form’s settings, and that the store’s page is published. See Shopify store pages.