Getting started
Getting started with Shoppy Connect
Learn how Shoppy Connect works, find your way around the dashboard, and set up your organisation, stores, channels, and team.
Shoppy Connect is the one place where you manage everything about your physical stores: addresses, phone numbers, opening hours, photos, and more. You keep those details up to date in Shoppy Connect, and it shares them with the places your customers look, such as Google Search and Maps, your Shopify website, your store locator, and your email marketing.
This guide covers:
- How Shoppy Connect works: the main ideas behind the product.
- A tour of the dashboard: the sidebar, the top bar, and what each button does.
- First-time setup: a checklist to get your organisation ready.
How Shoppy Connect works
A few ideas come up across the whole dashboard:
| Term | What it means |
|---|---|
| Organisation | Your business. Your stores, team, channels, and settings all belong to it. If you work with more than one business, you can belong to several organisations and switch between them. |
| Store | One physical location, with its own address, contact details, trading hours, and photos. |
| Channel | A place your store details are shared with, such as Google, Shopify, or Apple Maps. You connect a channel once, then choose which stores appear on it. |
| Website | A website that shows your Shoppy Connect widgets and forms, such as the store locator. Analytics can be filtered by website. |
| User | A member of your team who can sign in to the dashboard. Each user has a role and can be limited to certain stores. |
The usual flow is:
- Add your stores.
- Connect your channels.
- Keep your store details up to date in Shoppy Connect. Changes are sent to every channel the store is published to.
- Use analytics to see how customers find and interact with your stores.
A tour of the dashboard
When you sign in, you land on the Home dashboard.
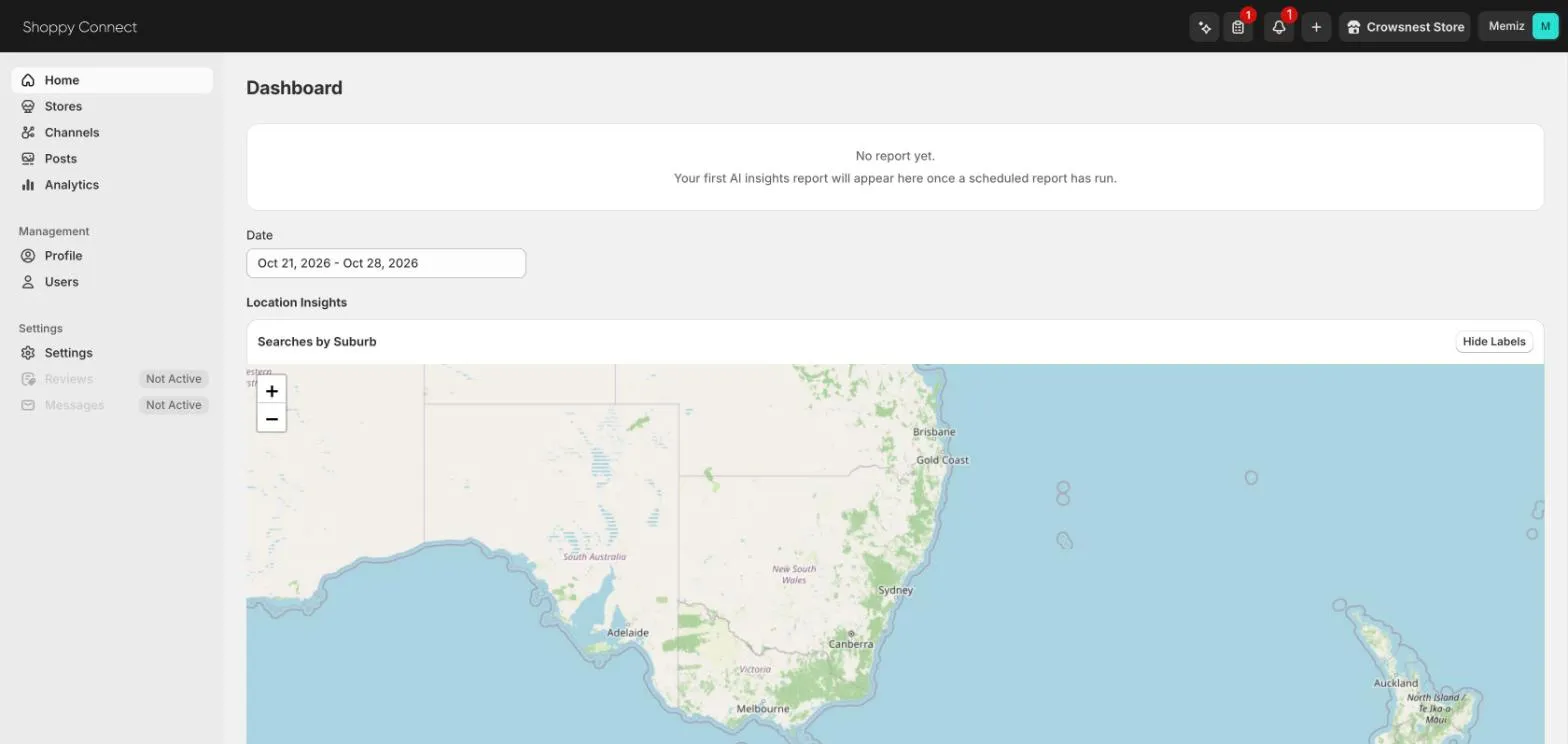
The dashboard has three parts:
- The sidebar on the left, to move between the main areas.
- The top bar, with shortcuts that are available on every page.
- The page in the middle.
The sidebar
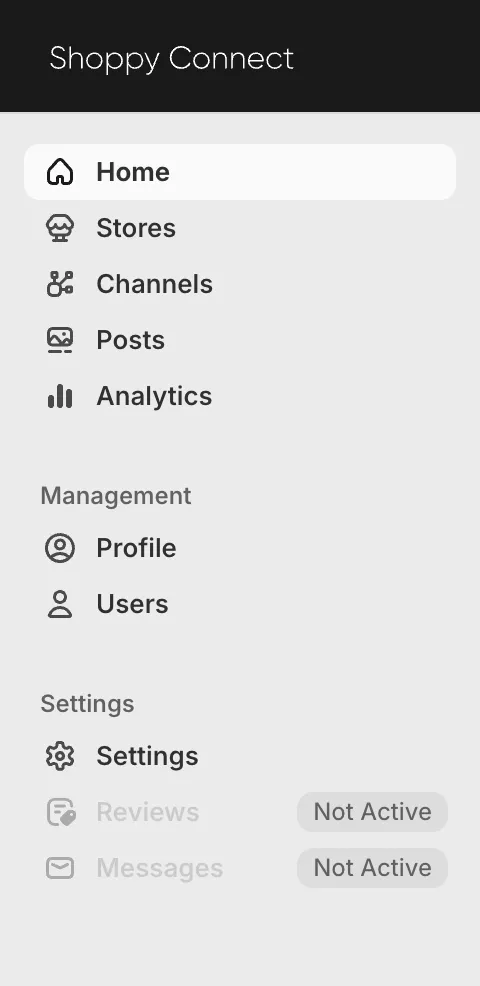
| Item | What you do there |
|---|---|
| Home | See how your stores are performing: your latest AI insights report, plus location, store, and product insights for the dates you choose. |
| Stores | Add, import, and edit your stores, their trading hours, and their store pages. See Managing stores, trading hours, and store pages. |
| Channels | Connect the platforms your store details are shared with. See Channel sync. |
| Posts | Write news, announcements, and blog posts that appear on your store pages. |
| Analytics | Charts and detailed reports on searches, views, calls, directions, and products. See Insights, analytics, and Shoppy AI. |
| Profile | Your own details and sign-in security. See Secure your account. |
| Users | Invite your team and choose what they can access. See Invite your team. |
| Settings | Settings for your whole organisation, such as websites, emails, tags, forms, and the Google sync. |
Reviews and Messages show Not Active when they aren’t part of your plan. They can’t be opened until they are turned on for your organisation.
The top bar
The buttons on the right of the top bar are available on every page.

From left to right:
| Button | What it does |
|---|---|
| Shoppy AI (sparkles) | Opens the AI assistant, which can look up and update store details for you. |
| My tasks (clipboard) | Shows the tasks assigned to you. The red number is how many are still to do. |
| Alerts (bell) | Shows your notifications. The red number is how many are unread. |
| + | Shortcuts to create things. |
| Store switcher | Chooses which store, or all stores, the dashboard is showing. |
| Account menu | Your organisation, the help centre, your account, and signing out. |
Shoppy AI
Click the sparkles button to open Shoppy AI on the right of the screen. Ask it things like “What are the trading hours for Crowsnest Store?” or “Set Friday trading hours to 9am–9pm.” See Shoppy AI for more.
My tasks
Tasks are things your team needs to do for a store, such as updating photos before a promotion. A task is usually created from a note on a store.
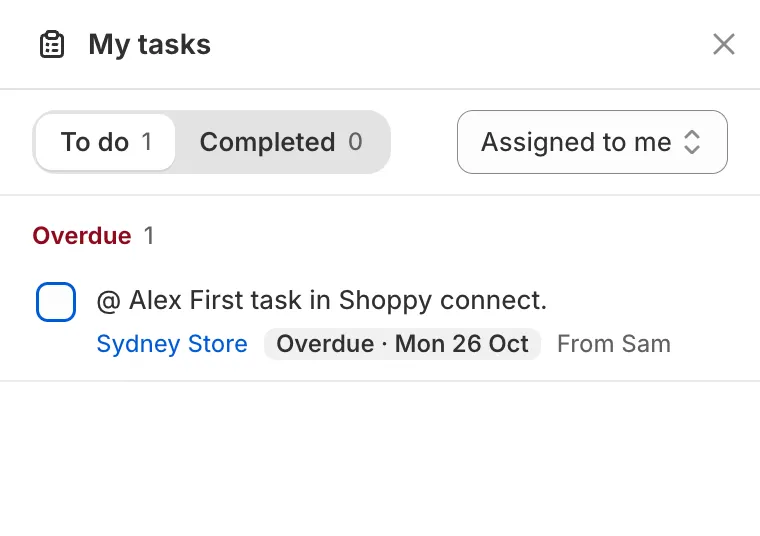
- To do and Completed switch between open and finished tasks.
- The filter on the right switches between Assigned to me and Assigned by me, so you can also follow up on tasks you gave to others.
- Overdue tasks are grouped at the top under Overdue.
- Each task shows the store it belongs to, its due date, and who created it. Click the store name to open the store.
- Tick the checkbox to mark a task as done.
Alerts
Alerts tell you when something needs your attention, for example when a task is assigned to you or someone mentions you in a note.
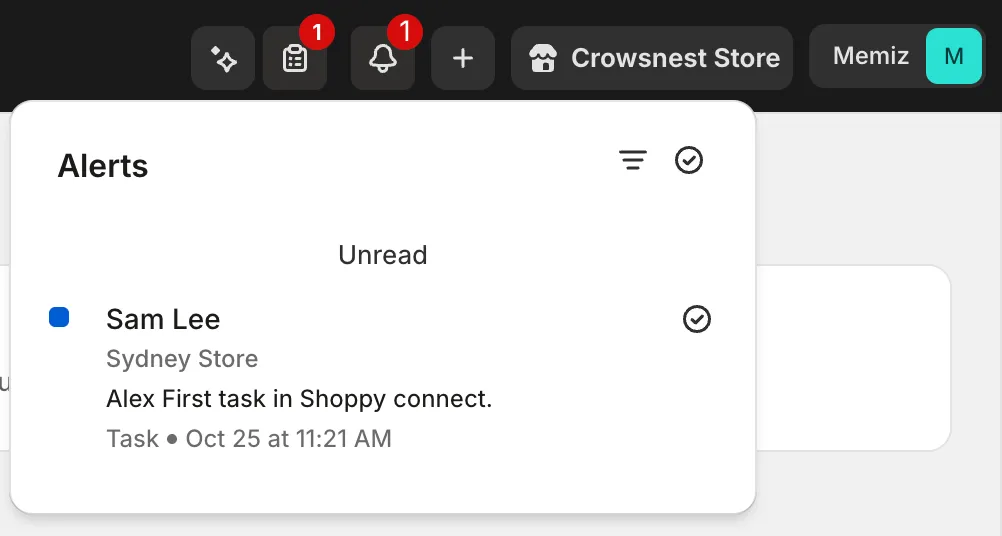
- Each alert shows who it’s from, the store, the message, and the type, such as Task or Mention.
- Click the tick next to an alert to mark it as read.
- Click the tick at the top of the panel to mark every alert as read.
- Click the filter icon to switch between Unread and Read alerts.
The + menu
The + button has shortcuts for the two things you’ll do most:
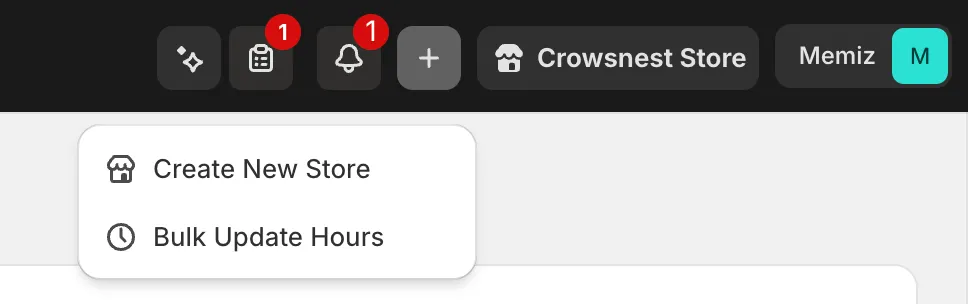
- Create New Store opens the form to add a single store.
- Bulk Update Hours lets you set hours for many stores at once, for example for a public holiday.
The store switcher
The store switcher shows which store the dashboard is focused on. Click it to choose a single store, or All Stores to see everything.
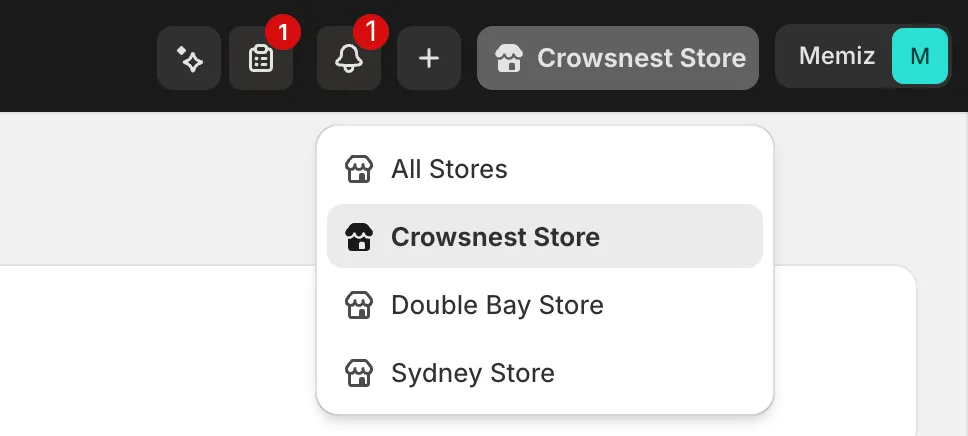
Pages such as Home and Analytics show data for the store you choose. Choose All Stores to compare stores or see totals across your business.
The account menu
Click your organisation name on the far right to open the account menu.
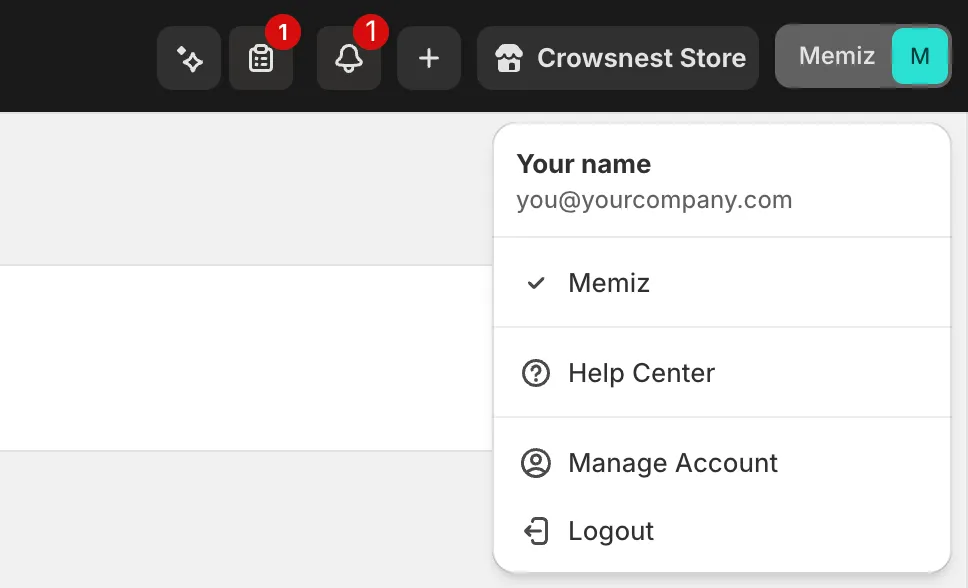
- Your name and email show which account you’re signed in with.
- Organisations: the organisation with a tick is the one you’re working in. If you belong to more than one, click another to switch.
- Help Center opens the help centre.
- Manage Account opens your Profile.
- Logout signs you out.
First-time setup
Work through these steps when you first start using Shoppy Connect. You can come back to any of them later.
1. Set up your organisation
Go to Settings › General.
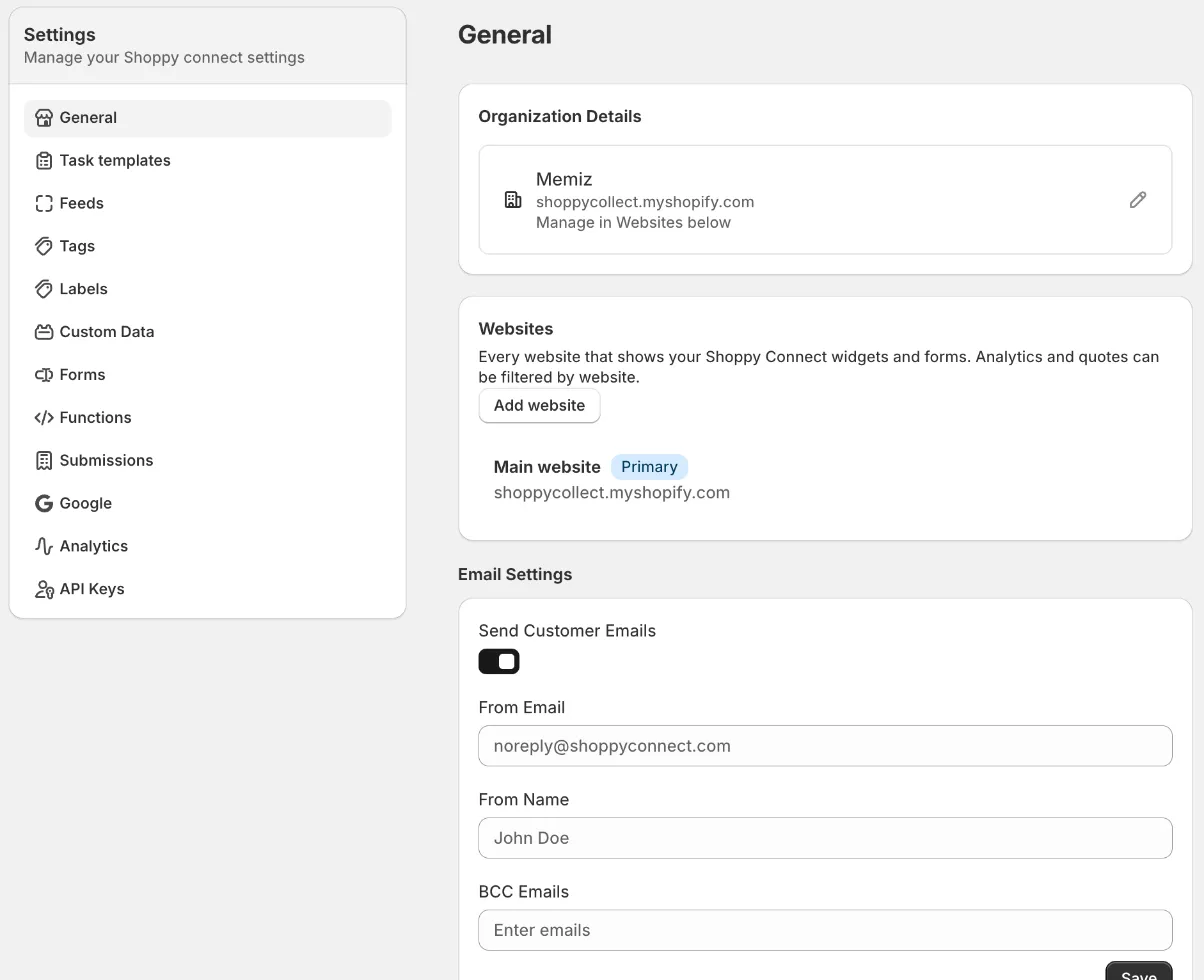
Organisation name and logo
Click the pencil icon on Organization Details.
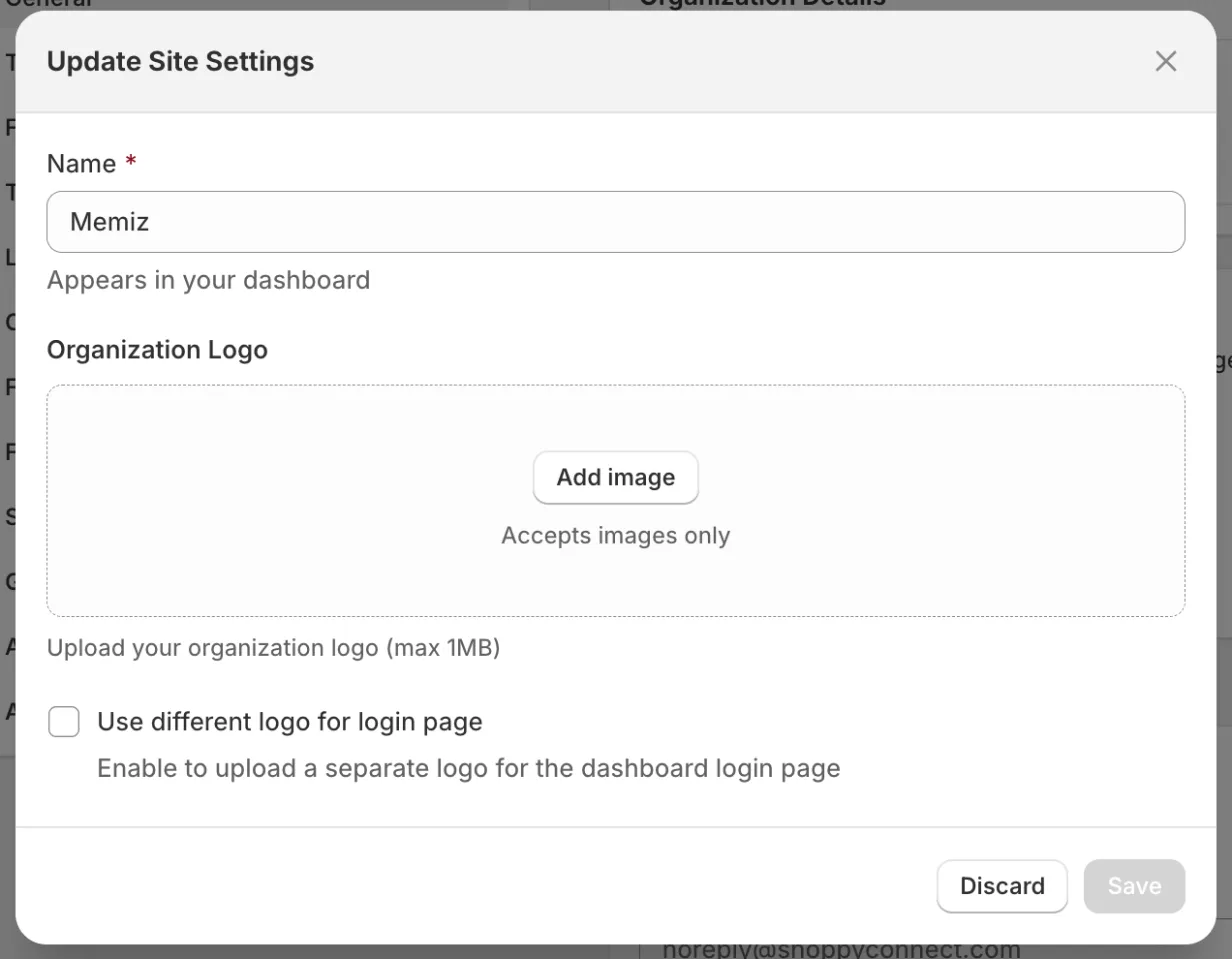
- Check the Name. This is the name your team sees in the dashboard.
- Click Add image to upload your logo. Logos must be an image file of up to 1 MB.
- Tick Use different logo for login page if you want a different logo on the sign-in page, then upload it.
- Click Save.
Websites
Add every website that shows your Shoppy Connect widgets and forms, such as your store locator or contact form. Your main website is marked Primary.
- Under Websites, click Add website.
- Enter the Domain, for example
yourshop.com, withouthttps://or a slash at the end. - Enter a Name that your team will recognise, for example “Australian store”. This name is shown in analytics filters.
- Click Save.
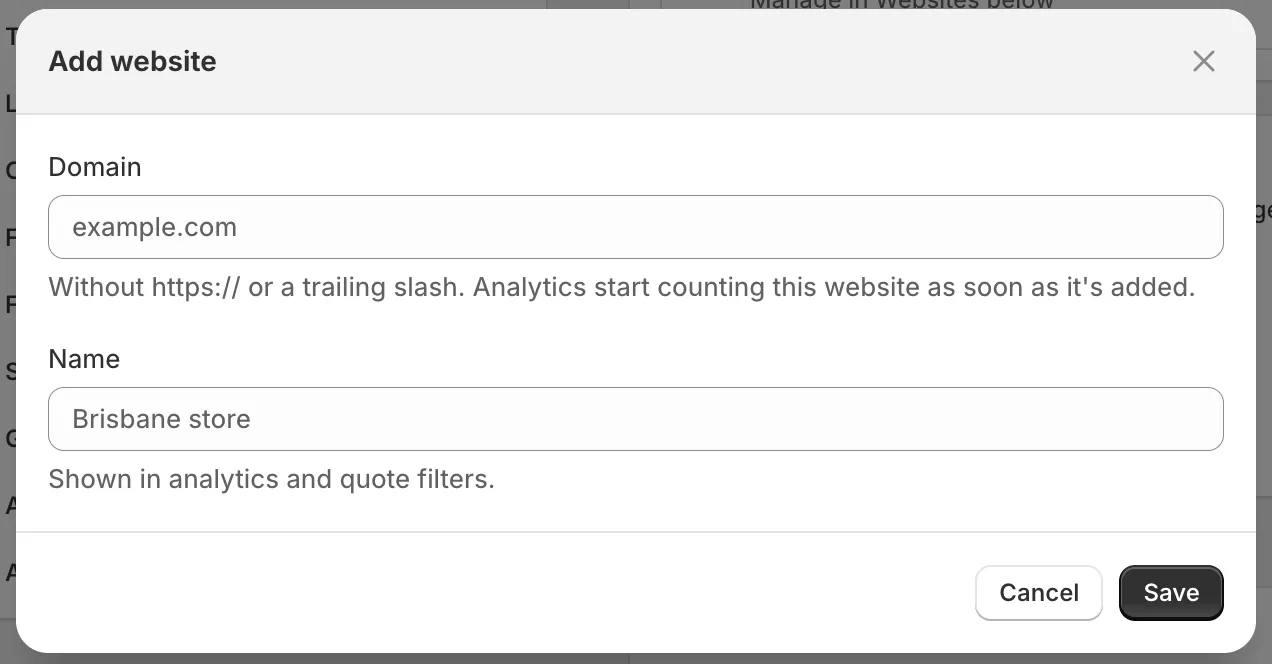
Analytics start counting a website as soon as it’s added, so add your websites before you look at your reports.
Email settings
Under Email Settings, choose how emails to your customers are sent, for example replies to the Contact Store form:
- Send Customer Emails: switch on to send emails to customers.
- From Email and From Name: who the emails come from.
- BCC Emails: addresses that get a copy of every customer email, for example your customer service inbox.
Click Save when you’re done.
2. Secure your account
Click Profile in the sidebar, or Manage Account in the account menu.
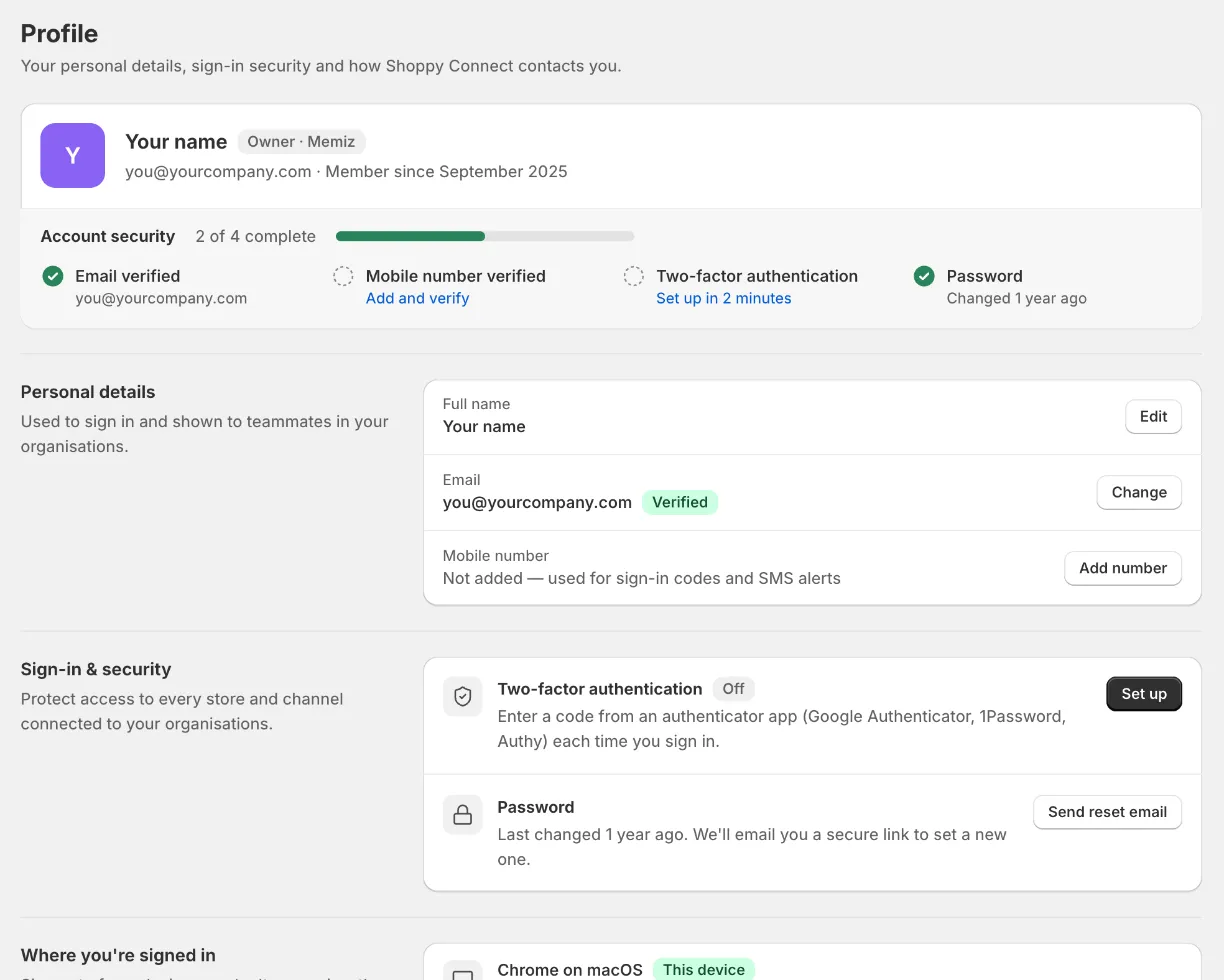
The Account security bar at the top shows how many of the four security steps are done. Complete all four:
- Email verified: confirm your email address.
- Mobile number verified: click Add and verify (or Add number) and enter your mobile number. It’s used for sign-in codes and SMS alerts.
- Two-factor authentication: click Set up and follow the steps to connect an authenticator app, such as Google Authenticator, 1Password, or Authy. After that, you enter a code from the app each time you sign in.
- Password: click Send reset email to get a secure link to set a new password.
Further down the page:
- Personal details: change your Full name and Email. Your name is shown to your teammates.
- Where you’re signed in: every device signed in to your account. If you see one you don’t recognise, sign it out, then change your password.
- Organisations: every organisation you belong to and your role in each. Roles are changed by an owner or administrator.
Two-factor authentication protects every store and channel connected to your organisations, so we recommend switching it on for everyone on your team.
3. Add your stores
Add your stores in whichever way is quickest for you:
- One at a time: click + › Create New Store.
- From a spreadsheet: on the Stores page, click Import from CSV.
- From Shopify or Google: on the Stores page, use the Shopify or Google menu to bring in locations you already have.
See Managing stores, trading hours, and store pages for step-by-step instructions.
For each store, check the address, phone number, and trading hours. These are the details customers rely on most.
4. Connect your channels
Go to Channels and click Connect on each platform you use, such as Google My Business and Shopify. Then choose which stores appear on each channel.
See Channel sync and Google Business Profile.
5. Invite your team
Go to Users in the sidebar to see everyone in your organisation.
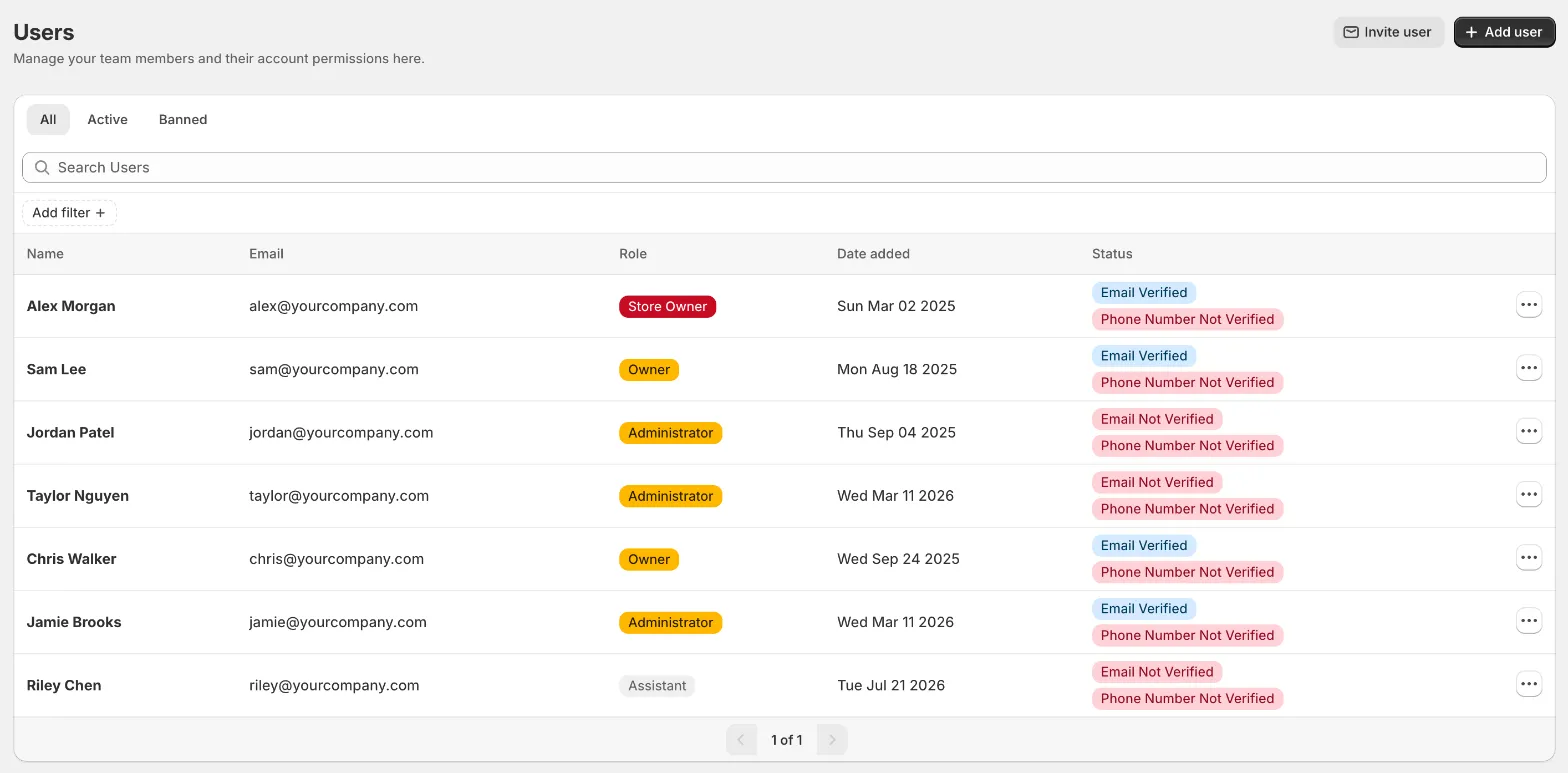
The list shows each person’s role and whether they have verified their email and phone number. Use All, Active, and Banned to filter the list, and the ⋯ menu on a row to manage that user.
To add someone, click Invite user:
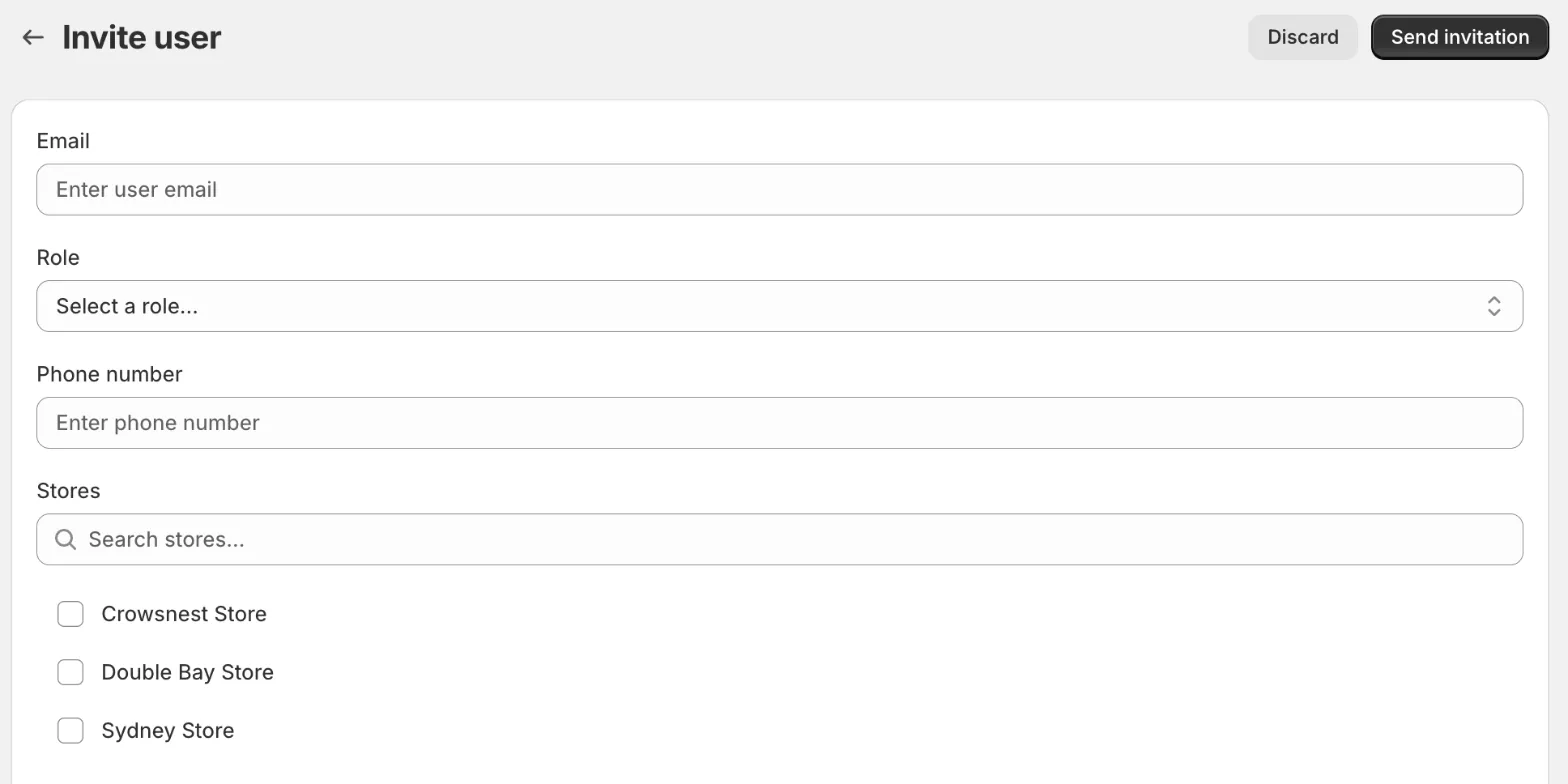
- Enter their Email.
- Choose a Role: Store Manager, Franchise, Analyst, Store Owner, or Administrator. The role controls what they can see and change.
- Optionally, enter their Phone number.
- Under Stores, tick the stores they should have access to. Use the search box if you have many stores.
- Click Send invitation.
They receive an email inviting them to join. Go to Users › Invited to see your invitations, when each one expires, and whether it has been accepted.
Add user creates the account straight away instead, with a name, email, and password you choose. Use Invite user where you can, so each person sets their own password.
Give each person only the stores and role they need. For example, a store manager usually only needs access to their own store.
6. Check your insights
Once your stores are live on your channels, customer activity starts to appear on the Home dashboard and in Analytics. Set up a weekly AI insights report so your team gets a summary by email. See Insights, analytics, and Shoppy AI.
Tips
- Set up one store completely first, check how it looks on Google and on your website, then add the rest.
- Switch on two-factor authentication for every user, not just administrators.
- Use the store switcher to focus on one store when you’re checking its details or performance, and switch back to All Stores when you’re done.
- Keep an eye on the red numbers on My tasks and Alerts. They show what needs your attention.