Marketing
Marketing and ads
Create marketing campaigns for your stores, send Klaviyo emails with products from your stores, post on Google, and link each store to its Google Ads and Microsoft Ads campaigns.
Shoppy Connect already knows your stores, their products, and their details. Marketing uses that information to promote your stores, so you don’t have to copy it into each marketing tool.
This guide covers:
- Marketing campaigns: send a Klaviyo email or a Google post for one or more stores.
- Google Ads and Microsoft Ads: link each store to its ad campaigns.
Before you start
Connect the channels you want to market on. See Channel sync.
| To do this | Connect |
|---|---|
| Send email campaigns | Klaviyo |
| Post on Google Search and Maps | Google My Business. See Google Business Profile. |
| Show products from a store in an email | Klaviyo, plus a feed for that store |
Marketing campaigns
The Marketing page
The Marketing page lists every campaign you’ve created.
To open it, open any store from the Stores list and click More actions › Create marketing campaign. This opens a new campaign. Click the back arrow to see the list.

| Column | What it shows |
|---|---|
| Name | The campaign name. |
| Stores | The stores the campaign promotes. |
| Channels | Where the campaign runs, for example Klaviyo. |
| Status | Draft until it’s sent or scheduled, then Scheduled. |
| Scheduled at | When the campaign goes out, if you scheduled it. |
Create a campaign
Click Create Campaign. You then go through a few steps, clicking Continue after each one. Continue stays greyed out until the step is complete.
1. Campaign details
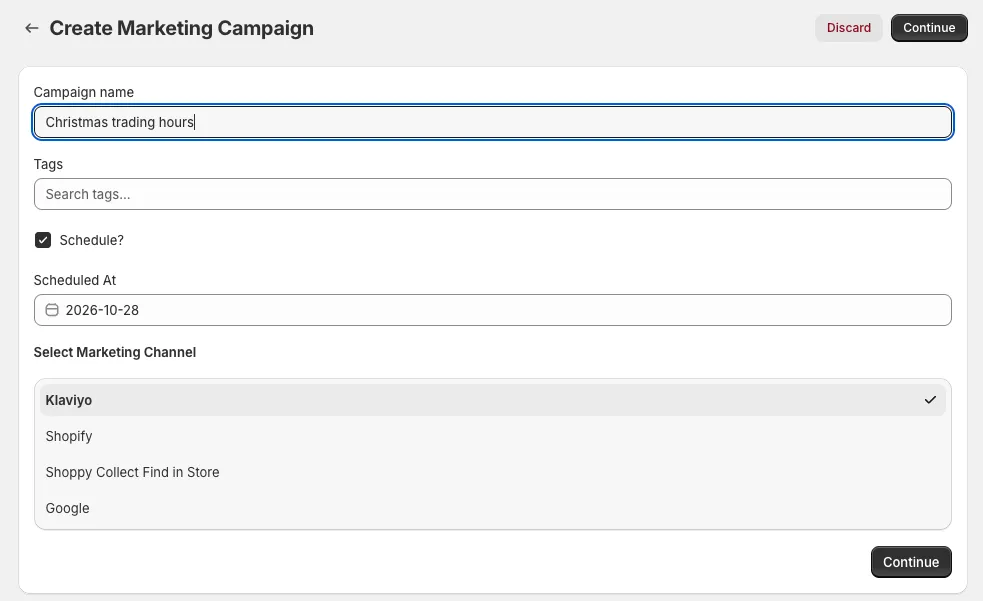
- Enter a Campaign name, for example “Christmas trading hours”. Customers don’t see this name.
- Optionally, add Tags to group your campaigns.
- To send the campaign later, tick Schedule? and choose the date under Scheduled At. Leave it unticked to send it when you finish.
- Under Select Marketing Channel, click the channel to use: Klaviyo, Shopify, Shoppy Collect Find in Store, or Google.
- Click Continue.
2. Choose stores
Under Select Stores To Market, tick the stores the campaign is for. Use Search stores… to find a store. You must choose at least one.
3. Channel details
What you fill in next depends on the channel.
Klaviyo email
Under Klaviyo Campaign Details:
| Field | What to enter |
|---|---|
| Send to | The Klaviyo lists or segments to send the email to. |
| Turn on Smart Sending | Skips people who got another email from you recently. Klaviyo recommends leaving it on. |
| Subject | The email subject line, for example “New arrivals are here!”. |
| Preview Text | The short line shown after the subject in the inbox. |
| Sender name | The name people see the email from, usually your business name. |
| Sender email | The address the email comes from. |
| Use as reply-to | Tick to send replies to the sender email. Untick to enter a different Reply to address. |
Then, under Select Products To Market, add products from your store to the email:
- Choose a Feed. Feeds are set up in Settings › Feeds.
- Click Select Products and tick the products to show.
- Choose the Columns of each row, the number of products side by side.
- Check the Preview of Product Block. Each product has a Buy now button.
Google post
Under Google Post Details, choose the Topic Type:
| Topic type | Use it for |
|---|---|
| Standard | General news or updates about your store. |
| Event | Something on a set date, such as a launch or in-store event. |
| Offer | A sale or discount, with an optional coupon code. |
| Alert | An important notice, such as a temporary closure. |
Then fill in:
- Summary: the text of the post. Add the Store name tag to put each store’s own name in the text, so one campaign works for many stores. The preview shows how it reads.
- Call to action: choose the Action Type, such as book, order, shop, learn more, sign up, or call, and enter the URL the button opens.
- For an Event: the event Title and details.
- For an Offer: the Coupon code, Redeem online URL, and Terms and conditions.
The post appears on each store’s Google Business Profile, in Google Search and Maps.
4. Finish
Click Continue to create the campaign. A scheduled campaign shows Scheduled and goes out on the date you chose.
Klaviyo campaigns
Each Klaviyo campaign also appears in your Klaviyo account. From Shoppy Connect you can:
- Click View in Klaviyo to see a scheduled campaign.
- Click Edit in Klaviyo to change the design or content of a draft before it’s sent.
Klaviyo sends the email. Check the results, such as opens and clicks, in Klaviyo.
Google Ads and Microsoft Ads
If you advertise each store with its own Google Ads or Microsoft Ads campaign, link the campaigns to the store. This keeps your ads and your store details together.
- Open the store from the Stores list.
- Find the Campaigns card on the right of the Details tab.
- Click Google Ads Campaign and tick the store’s campaigns. Type to search if you have many.
- Do the same under MS Ads Campaign for Microsoft Ads.
- Click Save.
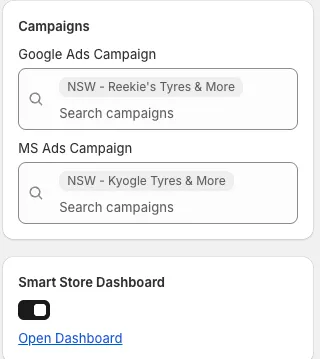
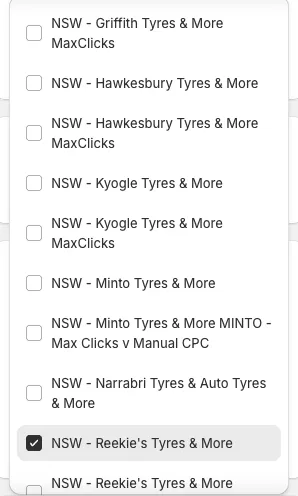
The lists show the campaigns in your connected Google Ads and Microsoft Ads accounts. A store can have more than one campaign. To unlink a campaign, untick it and click Save.
Shoppy Connect doesn’t create or change ads. Create, edit, and pay for your ads in Google Ads and Microsoft Advertising as usual.
Tips
- Name campaigns so you can find them later, for example “Dec 2026 – Christmas hours – NSW”.
- Use the Store name tag in Google posts, so each store’s post mentions its own name.
- Schedule seasonal campaigns, such as holiday hours, a week ahead.
- Before a Klaviyo campaign with products, check that the feed’s collections are up to date in Settings › Feeds.
- For holiday hours, also add special dates and a post, so every channel shows the right hours.
Troubleshooting
Continue is greyed out. Something required is missing. Check that you entered a campaign name, chose a channel, and chose at least one store.
A channel isn’t in the list. Connect it on the Channels page first. See Channel sync.
No Google Ads or Microsoft Ads campaigns appear. Check that your ads account is connected to Shoppy Connect. Contact Shoppy Connect support if you need help connecting it.