Team & account
Team and account
Invite your team, choose each person's role and stores, manage invitations, and keep your own account secure with a verified email, mobile number, and two-factor authentication.
Everyone who works in Shoppy Connect has their own account. As an owner or administrator, you decide who joins your organisation, what role they have, and which stores they can work on. Each person looks after their own sign-in details and security on their Profile.
This guide covers:
- Your team: users, roles, stores, and invitations.
- Your account: your profile, sign-in security, and organisations.
Your team
The Users list
Click Users in the sidebar to see everyone in your organisation.
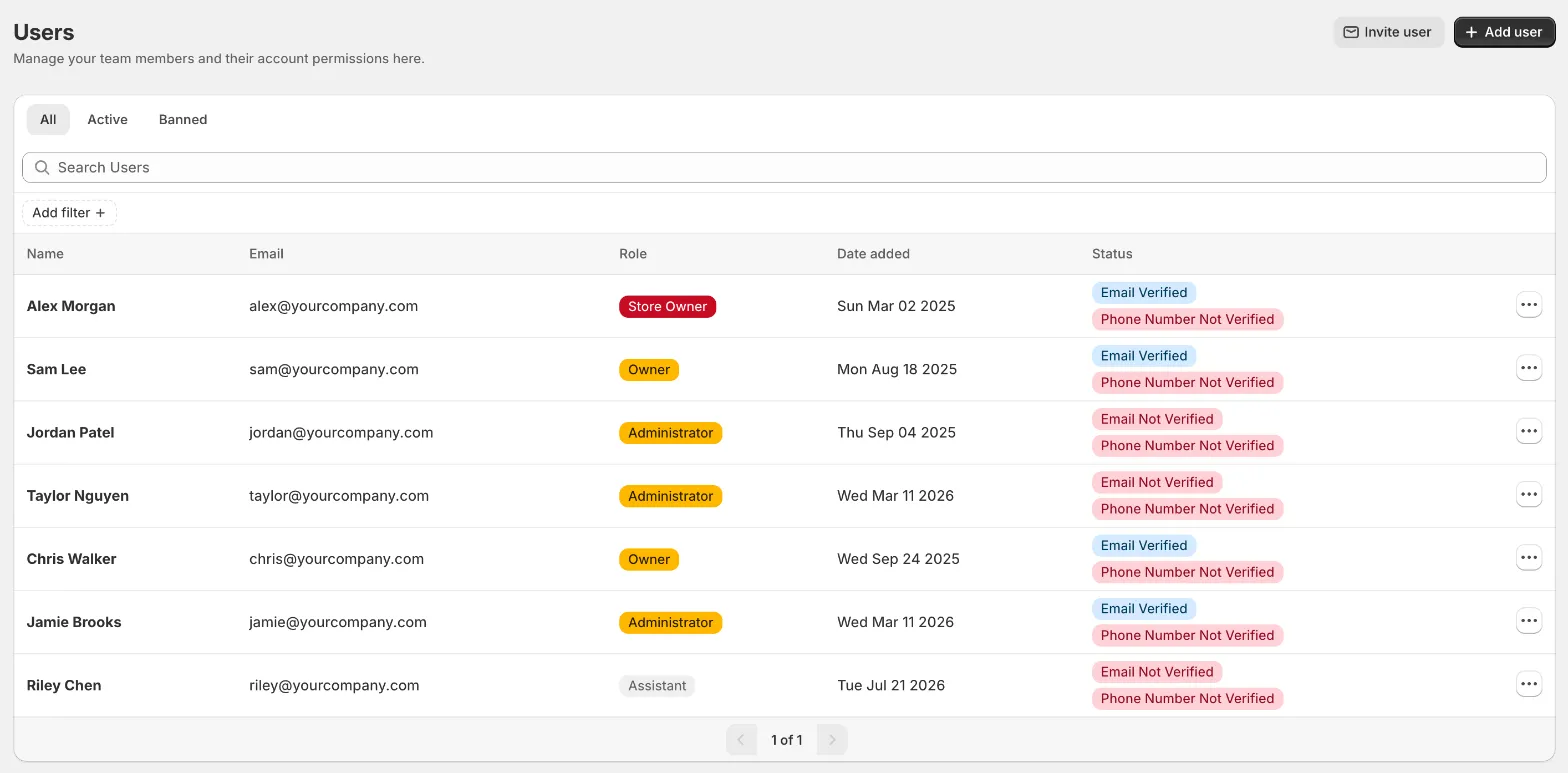
| Column | What it shows |
|---|---|
| Name and Email | Who the person is. |
| Role | What they can do in Shoppy Connect. See Roles. |
| Date added | When they joined your organisation. |
| Status | Whether they have verified their email address and phone number. |
To find people:
- Use All, Active, and Banned at the top to filter by account status.
- Type in Search Users to search by name or email.
- Click Add filter to filter by Email or Role.
Add people to your team
There are two ways to add someone. Invite user is the one to use in most cases.
| Option | What happens | Use it when |
|---|---|---|
| Invite user | They get an email inviting them to join, and they set their own password. | Almost always. |
| Add user | Their account is created straight away, with a name, email, and password you choose. | Someone can’t receive the invitation email. |
Invite a user
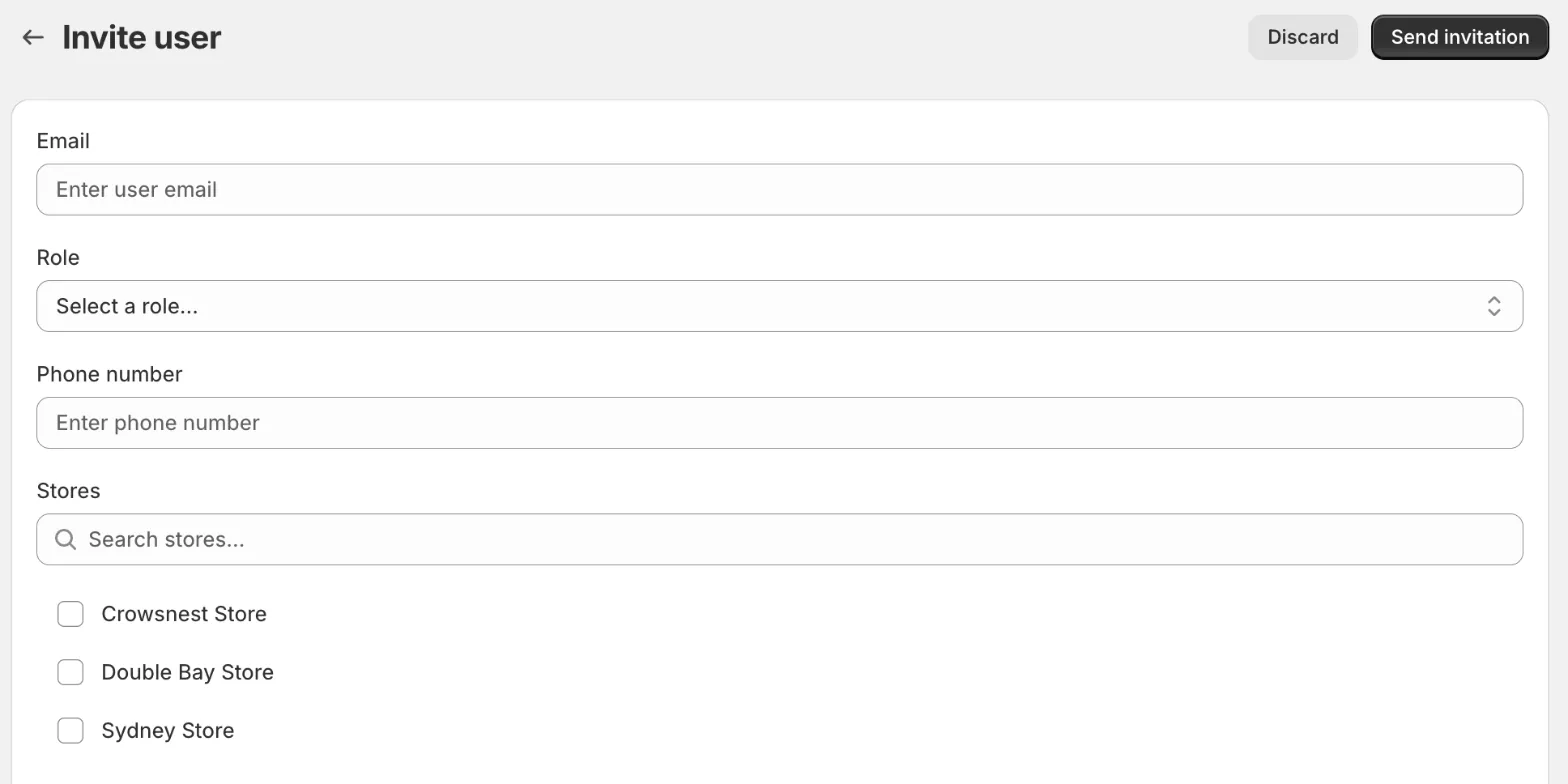
- On the Users page, click Invite user.
- Enter their Email.
- Choose a Role.
- Optionally, enter their Phone number.
- Under Stores, tick the stores they should work on. Use the search box if you have many stores.
- Click Send invitation.
Add a user directly
- On the Users page, click Add user.
- Enter their Name, Email, and a Password.
- Choose a Role, and optionally a Phone number.
- Tick the Stores they should work on.
- Click Create.
Share the password with them securely, not by email or chat, and ask them to change it the first time they sign in. See Change your password.
Manage invitations
Click Invited under Users in the sidebar to see every invitation you’ve sent.
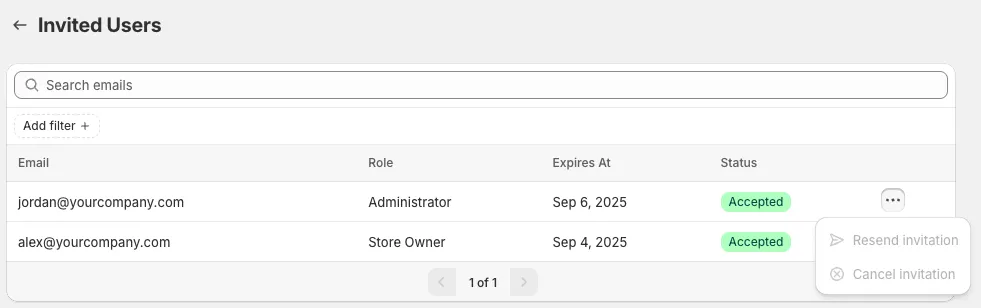
Each invitation shows the role it’s for, when it expires, and its Status, such as Accepted.
Use the ⋯ menu on an invitation to:
- Resend invitation, for example if it went to the person’s spam folder or has expired.
- Cancel invitation, if you sent it to the wrong address or the person no longer needs access.
These options aren’t available once an invitation has been accepted.
Roles
A person’s role decides what they can see and do in Shoppy Connect. You choose it when you invite them, and you can change it at any time.
When inviting or adding someone, you can choose:
- Store Manager
- Franchise
- Analyst
- Store Owner
- Administrator
The Users list can also show Owner, for the people who own the organisation, and Assistant.
Give each person the role with the least access they need to do their job. For example, someone who only reads reports doesn’t need to edit stores.
Change a person’s role or stores
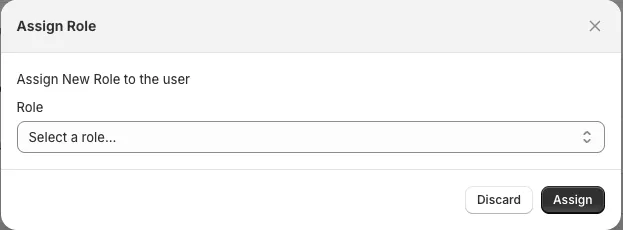
On the Users page, click the ⋯ menu on the person’s row.

Assign Role
- Choose the new Role.
- Click Assign.
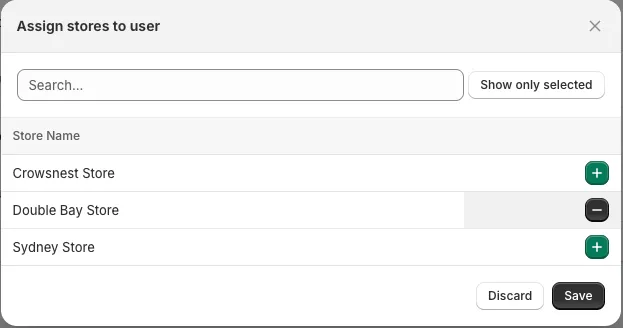
Assign Stores
The list shows every store. Stores the person can already work on have a − button, and the others have a + button.
- Click + to give them a store, or − to take it away.
- Use Show only selected to see just the stores they have, or the search box to find a store.
- Click Save.
Assign members from a store
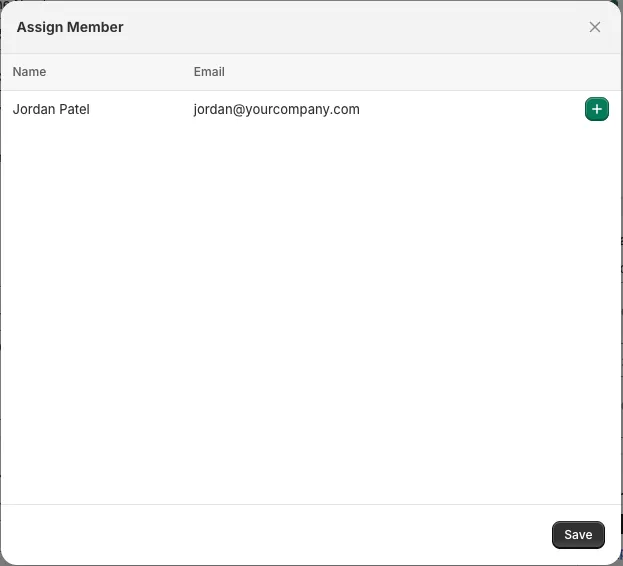
You can also choose who looks after a store from the store itself:
- Open the store from the Stores list.
- Click More actions › Assign members.
- Click + next to each person to add them.
- Click Save.
Your account
Click Profile in the sidebar, or Manage Account in the account menu, to manage your own account.
Account security
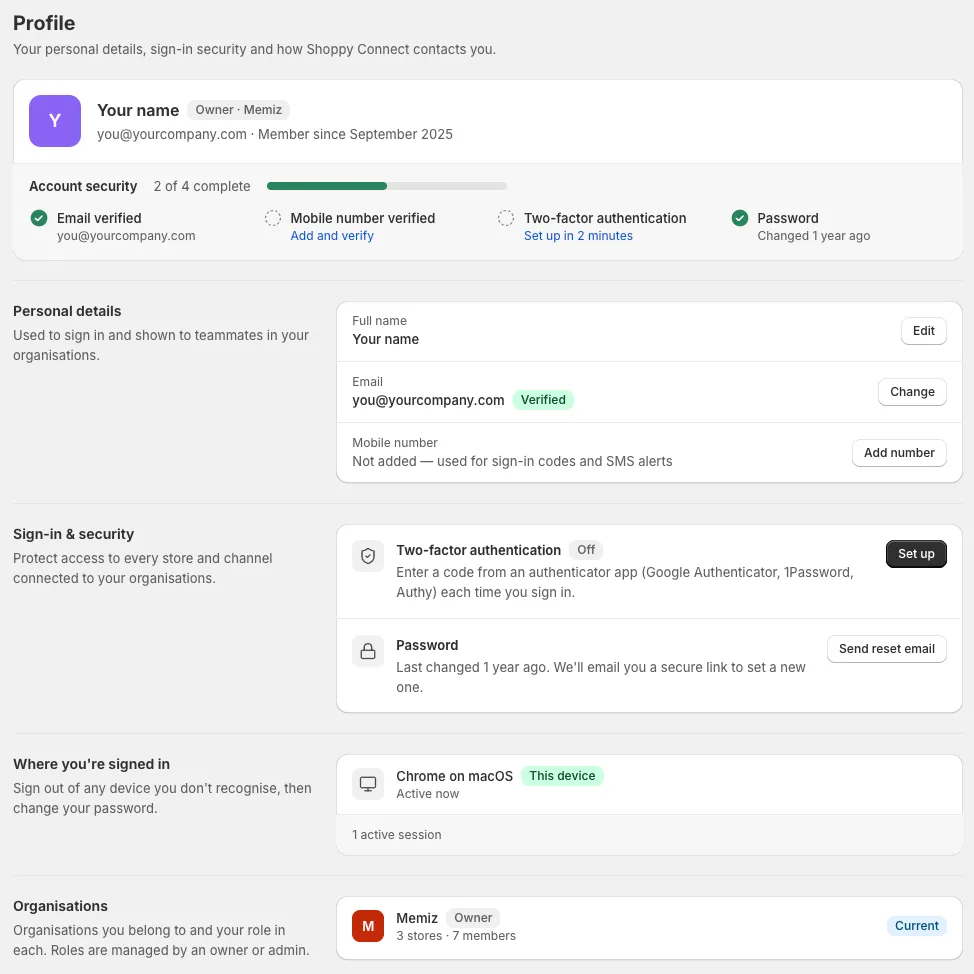
The Account security bar at the top shows how many of the four security steps you’ve done:
- Email verified
- Mobile number verified
- Two-factor authentication
- Password
Any step that isn’t done has a link to finish it, such as Add and verify or Set up in 2 minutes.
Personal details
Full name
Click Edit, change your name, and click Save. Your name is shown to your teammates.
- Click Change.
- Enter your new email address.
- Click Send verification link.
- Open the email sent to your new address and confirm it.
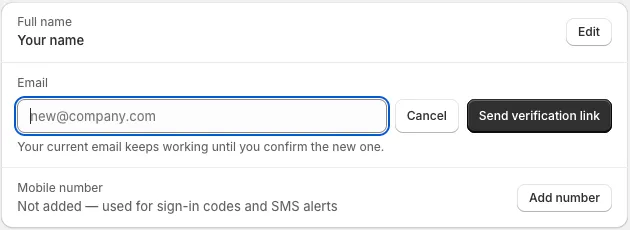
Your current email keeps working until you confirm the new one.
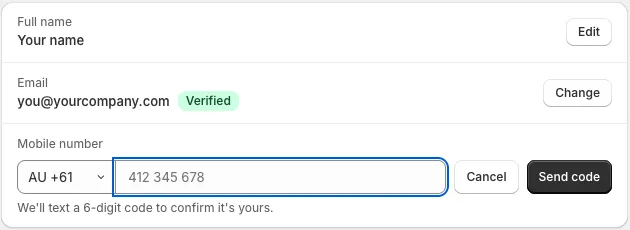
Mobile number
Your mobile number is used for sign-in codes and SMS alerts.
- Click Add number.
- Choose your country code, for example AU +61, and enter your number.
- Click Send code.
- Enter the 6-digit code from the text message.
Sign-in and security
Two-factor authentication
With two-factor authentication, you enter a code from an authenticator app, such as Google Authenticator, 1Password, or Authy, each time you sign in. This keeps your account safe even if someone learns your password.
Click Set up and follow the steps to connect your authenticator app.
Two-factor authentication protects every store and channel connected to your organisations. Ask everyone on your team to switch it on.
Change your password
Click Send reset email. You’ll get an email with a secure link to set a new password.
Where you’re signed in
This section lists every device signed in to your account, such as Chrome on macOS. The device you’re using now is marked This device.
If you see a device you don’t recognise, change your password straight away and switch on two-factor authentication.
Organisations
This section lists every organisation you belong to, the number of stores and members in each, and your role. The one you’re working in is marked Current.
To switch organisations, open the account menu (your organisation name, top right) and choose another organisation. Roles are managed by an owner or administrator of each organisation.
Tips
- Invite people instead of adding them, so nobody else knows their password.
- Only give access to the stores each person works on.
- Review the Users list every few months, and remove access for people who have left.
- Ask everyone to complete all four account security steps.
Troubleshooting
Someone didn’t get their invitation. Ask them to check their spam folder. Then go to Users › Invited and use Resend invitation. Check that the email address is correct.
Someone can’t see a store. Open the ⋯ menu on their row and choose Assign Stores. Check that the store has a − button next to it.
I can’t change someone’s role. Roles are managed by an owner or administrator. Ask one of them to change it for you.