Managing stores
Add and edit a store
Add a store to Shoppy Store Locator, place it on the map, and fill in its contact details, description, photos, tags, and store page.
A store is one physical location your customers can visit. Each store has its own address, pin on the map, contact details, trading hours, photos, and tags. Only active stores with a pin are shown on your store locator.
This guide covers:
- Add a store
- Store details
- Address and map pin
- Description, photos, status, and tags
- Links and socials
- Store page
- Save, discard, or delete a store
Add a store
Go to Stores and click Create store. Choose how you want to add stores:
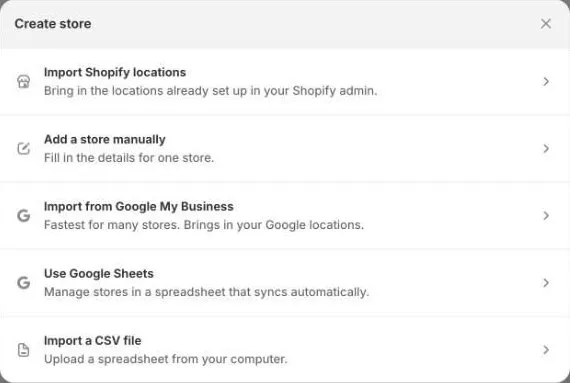
| Option | Best for |
|---|---|
| Import Shopify locations | Locations you already have in your Shopify admin. |
| Add a store manually | One store at a time. This guide walks you through the form. |
| Import from Google My Business | Many stores you already manage on Google. |
| Use Google Sheets | Managing your stores in a spreadsheet that syncs. |
| Import a CSV file | Many stores at once from a spreadsheet on your computer. |
Click Add a store manually to open the Add store form. New stores start with your default trading hours from Settings.
To change a store later, click it on the Stores page, or click ⋯ at the end of its row and choose Edit store.
Store details
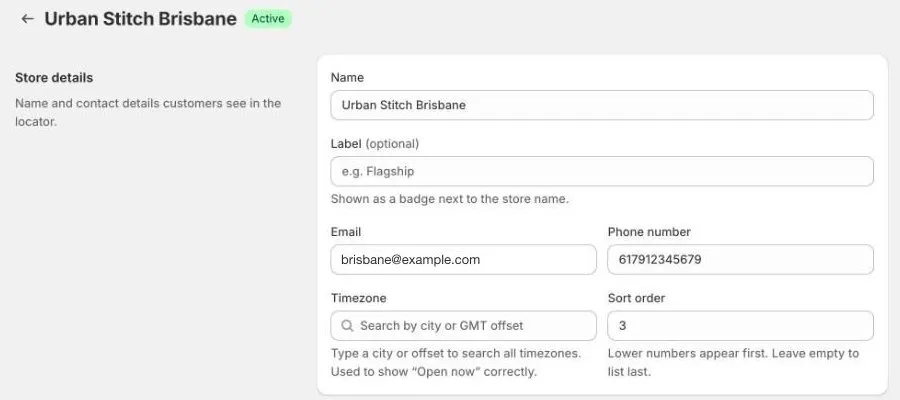
| Field | What it does |
|---|---|
| Name | Required, at least 3 characters. Customers see it in the store locator, for example Urban Stitch Perth. |
| Label | Optional. A short badge shown next to the store name, such as Flagship or New. |
| The store’s email address. | |
| Phone number | The store’s phone number. |
| Timezone | The store’s local timezone. Type a city or GMT offset to search. It’s used to show Open now correctly. |
| Sort order | Lower numbers are listed first in your store locator. Leave it empty to list the store last. Duplicates are fine. |
Set the Timezone for every store, especially if your stores are in different states or countries. Without it, a store can show as open or closed at the wrong time.
Address and map pin
The address places the store on the map.
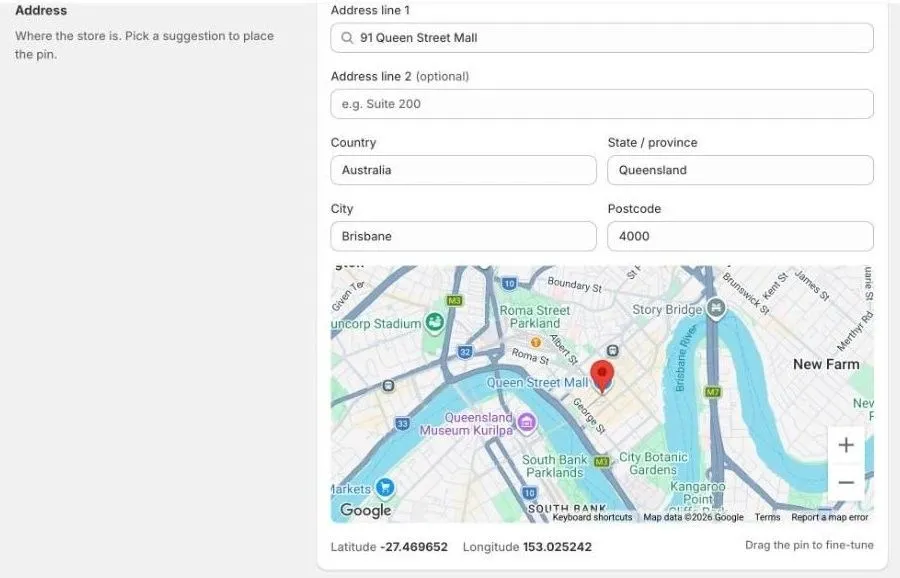
- Start typing the address in Address line 1.
- Pick the right address from the suggestions. The app fills in Country, State / province, City, and Postcode, and drops a pin on the map.
- Check the pin. If it’s not exactly on the store, drag it to the right spot. The Latitude and Longitude update as you drag.
- Add a unit, suite, or shop number in Address line 2 if you need to.
Address line 1 is required. If you type an address without picking a suggestion, the store is saved without a pin and won’t show on the map. See Fix stores missing from the map.
Description, photos, status, and tags
Description
- Short description: one or two lines shown in the store list, for example
Relaxed summer styles. - Description: a longer description shown on the store’s page. Use the toolbar to add headings, bold text, lists, and links. Click + Accordion to add a collapsible section, or Edit HTML to edit the HTML directly.
Trading hours
Set the store’s weekly hours and any holidays. See Trading hours and special dates.
Media
Add photos of the store. They’re shown on the store’s page.
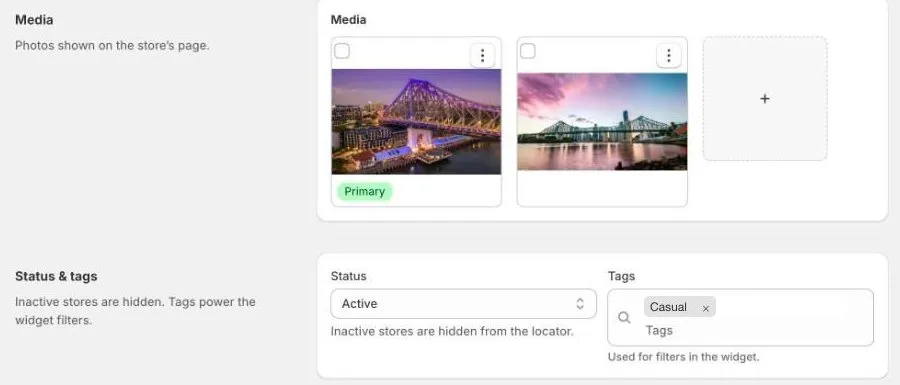
- Drag photos into the Media box, or click it to upload. You can upload JPG, PNG, and WebP files up to 2 MB each.
- The Primary photo is the store’s main image. To change it, click ⋮ on a photo and choose Select as primary.
- To remove photos, tick them and click Remove.
Status and tags
- Status: Active stores are shown on your store locator. Inactive stores are hidden but kept, so you can turn them back on later. Use Inactive for a store that’s closed for renovations, or one that’s not open yet.
- Tags: labels such as
Outlet,Service centre, orCasual. Customers can use them to filter your store locator. Type a tag and press Enter to add it.
Keep tag names consistent across stores. Outlet and outlet are two different tags.
If the store is linked to your Google Business Profile, you’ll see Linked to Google Business Profile here. Its trading hours and special dates stay in sync with Google. See Google Business Profile.
Links and socials
All optional. They’re shown on the store’s page and can appear in search results.
- Founding date: when the store opened.
- Website: a page about this store, if you have one.
- Facebook, Instagram, and X: links to the store’s own social pages.
Store page
A store page is a page on your online store for one store, with its details, hours, photos, and map. The app creates and manages it for you.
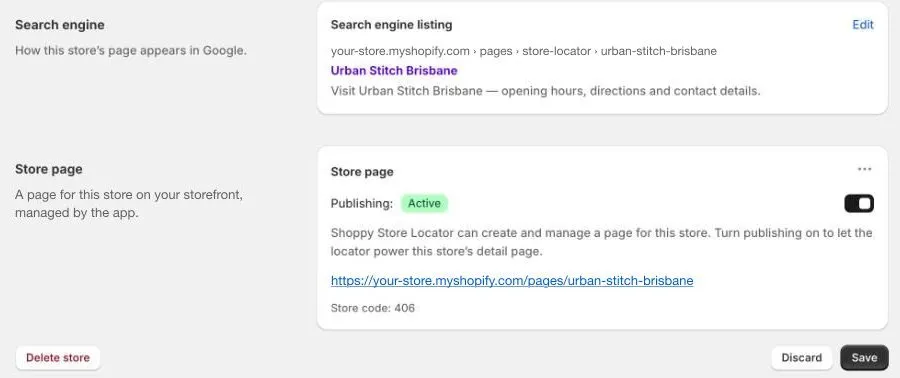
- Search engine listing previews how the store’s page could appear in Google search results.
- Create store page creates the page on your online store. The page address is based on the store name, for example
/pages/urban-stitch-brisbane. - Once the page exists, the Publishing switch shows or hides it on your online store. The page link is shown under it.
- Click ⋯ for more actions: View page, Translate page, or Delete store page. Deleting a store page removes its address, so links to it stop working. The store stays in your store locator.
- Store code is the store’s ID in the app.
To create pages for many stores at once, use Create store pages on the Stores page.
For more about store pages, including how to change their layout and link to them, see Store pages.
Save, discard, or delete a store
- When you change anything, a save bar appears at the top of the page. Click Save to keep your changes, or Discard to undo them.
- If a required field is missing, a message at the top lists what needs fixing. Click an item to jump to the field.
- Changes show on your store locator straight away.
To delete a store, click Delete store at the bottom of the form, then confirm. This can’t be undone. The store’s page on your online store isn’t deleted, so delete it first from the Store page section if you no longer need it.
If you might reopen the store later, set its Status to Inactive instead of deleting it.