Settings and design
Custom layouts
Build your own store page or store locator layout with the drag-and-drop visual editor, then publish it on the Design tab.
If the pre-built layouts don’t fit your brand, build your own with the visual editor. You drag blocks, such as the store name, trading hours, or a map, onto the page and arrange them how you like.
You can make two kinds of custom layout:
- Store page layouts: the page for each individual store.
- Locator layouts: the main store locator page.
Create a layout
- Go to Settings › Design.
- Under Store page layouts or Locator layouts, click Create layout.
- For a locator layout, choose a starting point:
- List with map: a store list beside a map.
- Magazine grid: photo cards that open each store’s page. No map.
- Two column: a title, a search box, and stores in two columns. No map.
- Two column, large image: wide cards with a large store photo, next to a map.
The visual editor opens.
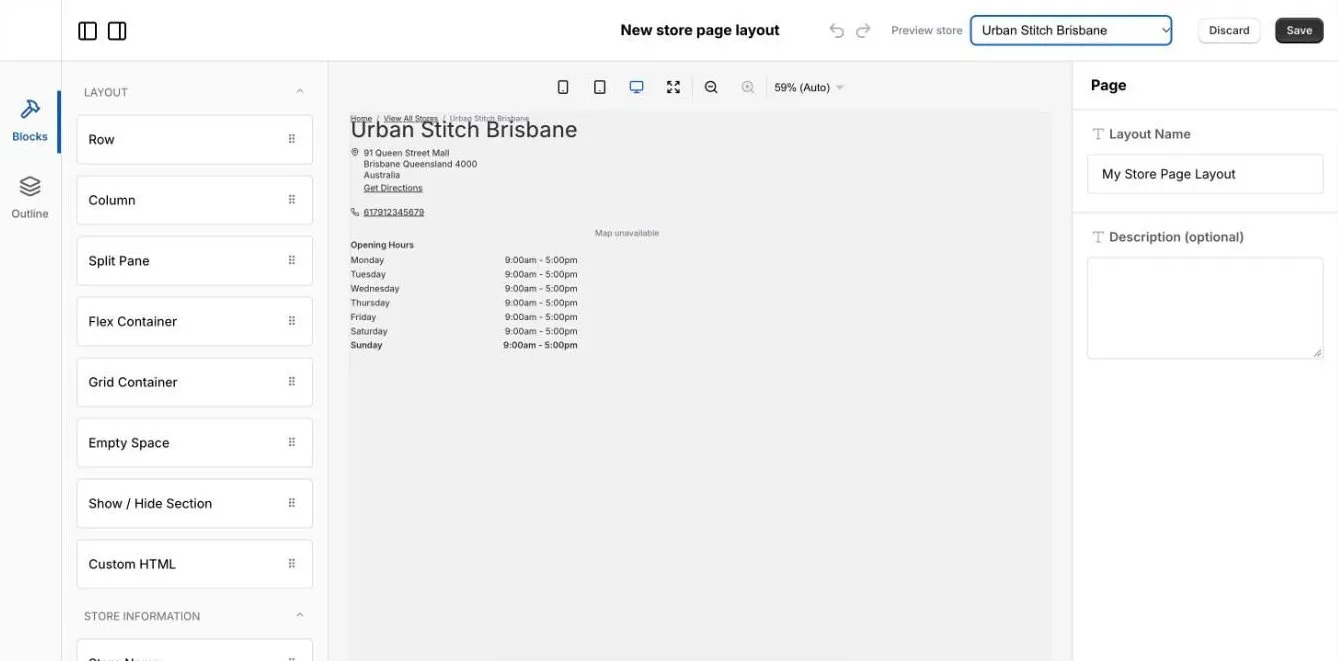
Use the editor
- Blocks (left): drag a block onto the preview to add it. Blocks are grouped, for example:
- Layout: Row, Column, Split Pane, Flex Container, Grid Container, Empty Space, Show / Hide Section, and Custom HTML.
- Store Information: Store Name, Store Label, Short Description, Store Description, and Store Tags.
- Contact & Location: Store Address, Phone Number, Email Address, Get Directions, and Google Map.
- Trading Hours: Trading Hours, Special Trading Hours, and Open / Closed Status.
- Media & Social: Image Gallery and Social Media Links.
- Navigation: Breadcrumbs, Back to All Stores, and Store Page Link.
- Locator (locator layouts only): Store Search, Store Filters, Store List, Store Card, Store Map, Store Tabs, Sort Control, Result Count, and No Results Message.
- Outline (left): see every block on the page as a list, and select one.
- Settings (right): click a block to change its settings, such as text, spacing, or which details it shows. With nothing selected, set the Layout Name and an optional Description.
- Preview store (top): choose which store fills the preview, so you can check a layout with real details.
- Device buttons (above the preview): check the layout on mobile, tablet, desktop, or full width. Use the zoom controls to see more or less.
- Undo and Redo: step back or forward through your changes.
Different blocks are available for store page layouts and locator layouts.
Save the layout
Click Save to save the layout and go back to Settings. Click Discard to leave without saving.
Saving doesn’t put the layout live. Your new layout appears in the list on the Design tab.
Publish the layout
- On Settings › Design, find your layout in the list.
- Click Publish.
- Click Save at the top of the page.
Your store locator or store pages now use the layout. Only one layout of each kind is active at a time.
Edit or delete a layout
- Click Edit next to a layout to open it in the editor again. Changes to the active layout show on your online store when you save in the editor.
- To delete a layout, click ⋯ › Delete, then confirm. You can’t delete the active layout: publish another one first. Deleting can’t be undone.
Tips
- Name layouts clearly, such as
Store page with gallery, so you can tell them apart. - Preview a few different stores, including one with no photos or no special hours, to check the layout still looks good.
- Check the mobile view before you publish.