Settings and design
Map settings
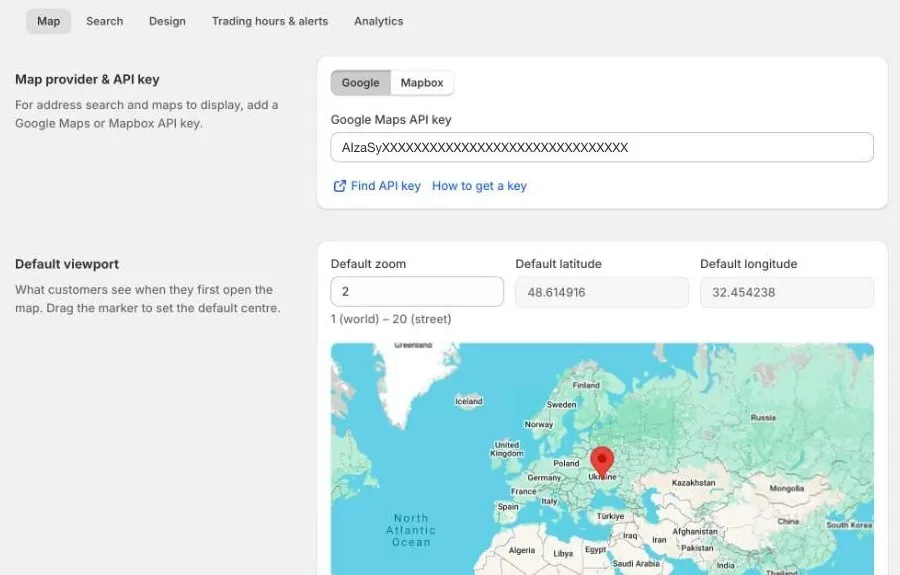
Choose Google Maps or Mapbox, add your API key, and set the area customers see when they first open your store locator.
The Map tab in Settings controls which map your store locator uses and where it starts.
Do you need a map key?
No. Without a key, your store locator uses a free map, and customers can still:
- See your stores on the map.
- Search by store name, suburb, or postcode.
- Use Use my current location (or your own button text) to find stores near them.
Add a Google Maps or Mapbox key if you want:
- Address suggestions as customers type, so they can search from any street address.
- Google Maps or Mapbox map styles instead of the free map.
Until a key is saved, a banner at the top of Settings reminds you that address search is off.
Add a Google Maps key
- Go to Settings › Map.
- Choose Google.
- Click How to get a key for a step-by-step guide with short videos. In short:
- Create a project in Google Cloud and turn on billing. Google Maps Platform includes free monthly usage.
- Turn on three APIs: Maps JavaScript API (shows the map), Places API (address suggestions), and Geocoding API (places stores on the map).
- On the Credentials page, click Create credentials › API key, and copy the key.
- Paste the key into Google Maps API key.
- Click Save.
We recommend you restrict the key to your store’s domain in Google Cloud, so no one else can use it. The How to get a key guide links to Google’s instructions.
Add a Mapbox token
- Go to Settings › Map.
- Choose Mapbox.
- Click Find API key to open your Mapbox access tokens, and copy a token.
- Paste it into Mapbox access token.
- Click Save.
You can use Google or Mapbox, not both. Switching from one to the other clears the key you had before.
Set the default viewport
The default viewport is what customers see when they first open the map, before they search.
- Under Default viewport, drag the marker on the map to the centre you want, such as the middle of the area your stores cover. Default latitude and Default longitude update as you drag.
- Set Default zoom, from
1(the whole world) to20(street level). For one city, try10to12. For a whole country, try4to6. - Click Save.
Tips
- After you add a key, open your store locator and type part of an address to check suggestions appear.
- If the map or search stops working after you add a Google key, check the three APIs are turned on and billing is set up in Google Cloud.
- Treat your Google key like a password: keep it restricted to your domain.