Getting started
Getting started with Shoppy Find in Store
Learn how Shoppy Find in Store works, find your way around the app, and show live store stock on your product pages.
Shoppy Find in Store is a Shopify app that shows customers which of your stores have a product in stock. It adds a widget to your product pages. Customers search by address or use their location, then see the nearest stores, how much stock each one has, and each store’s trading hours and contact details.
You manage everything from inside your Shopify admin.
This guide covers:
- How Shoppy Find in Store works: the main ideas behind the app.
- A tour of the app: the menu and the Home page.
- First-time setup: from installing the app to live stock on your product pages.
How Shoppy Find in Store works
A few ideas come up across the whole app:
| Term | What it means |
|---|---|
| Location | One of your physical stores. Locations are imported from your Shopify locations, so the app can read their stock. Only active locations are shown to customers. |
| Stock | The available inventory of the product at each Shopify location. The app reads it straight from Shopify, so it’s always current. |
| Widget | What customers see on your product pages: a Find in Store button that opens the list of stores and their stock. You add it to your theme as an app block. |
| Google Maps API key | Turns on address suggestions as customers type, and the map. You create it in your own Google Cloud account. |
| Tabs | The widget can show more than one view, such as Stock in Store, Click & Collect, or Delivery. You choose them in Settings › Widget appearance. |
| Stock levels | You decide when a store counts as in stock or low on stock, and the message customers see for each. See Settings › Stock. |
The usual flow is:
- Add your locations in Shopify, then import them into the app.
- Check your products have stock at those locations.
- Add the widget to your product pages.
- Customise how it looks and what it says.
A tour of the app
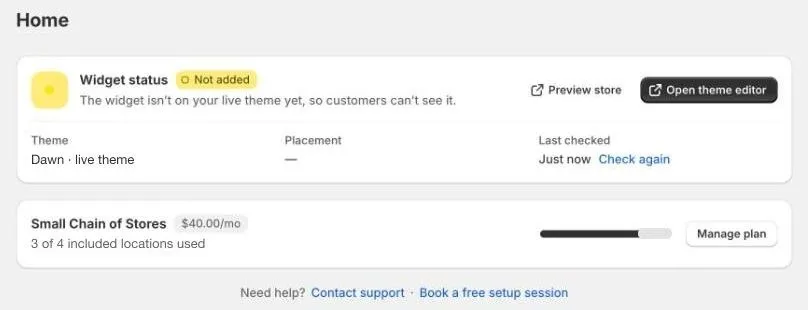
Open the app from Apps › Shoppy Find in Store in your Shopify admin. You land on Home.
The menu
| Item | What you do there |
|---|---|
| Home | See whether the widget is on your theme, follow the setup guide, and see your plan. |
| Settings | Add your Google Maps key, and choose how the widget looks, how stock is shown, how customers search, and your integrations. |
| Locations | Import and edit your locations, their trading hours, and special dates. |
| Translate | Translate the widget’s wording into other languages. See Translations. |
| Billing | See your plan and change it. |
| Help | Contact support or book a free setup session. |
Home
- Widget status: whether the widget is on your live theme. It shows Live or Not added, the theme it checked, and when. Click Check again after you change your theme. See Add the widget to your product page.
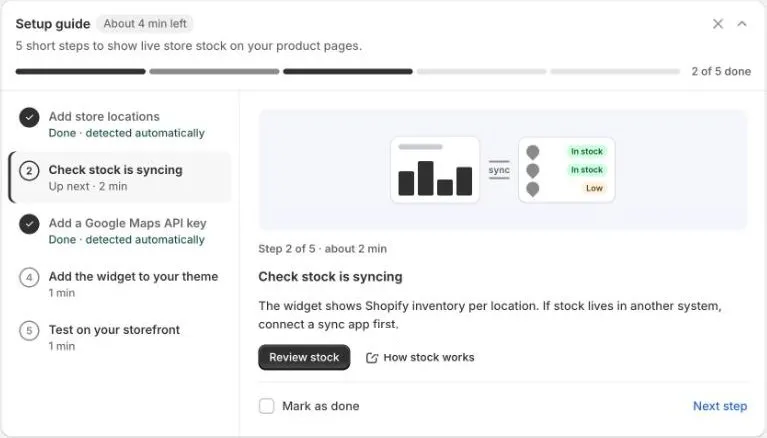
- Setup guide: five short steps to get you live. Each step ticks itself off when the app sees it’s done, or you can mark it as done. Once every step is done, the guide shows Setup complete.
- Plan: your plan, its price, and how many of its included locations you’re using. Click Manage plan to change it.
- Need help?: links to contact support or book a free setup session.
First-time setup
The setup guide on Home walks you through these steps. It takes about 7 minutes.
1. Add store locations
Find in Store reads stock from your Shopify locations, so each store needs to be a location in Shopify first.
- In your Shopify admin, go to Settings › Locations and check each of your stores is there, with its full address.
- In the app, go to Locations and click Import › Import from Shopify.
- Choose the locations customers can check stock at, then click the import button, for example Import 3 locations.
- Open each imported location, set its Status to Active, and set its trading hours. Imported locations start as Inactive, with no trading hours.
See Import locations from Shopify.
If your stores are managed in Shoppy Connect, you’ll see Locations are managed in Shoppy Connect instead, and you edit them there.
2. Check stock is syncing
The widget shows each product’s available quantity at each location, as recorded in Shopify.
- If you track stock in Shopify, check your products have stock at your store locations. Go to Products, open a product, and look at its Inventory.
- If your stock lives in another system, such as a point-of-sale or warehouse system, connect a stock sync app first so Shopify has the right numbers.
3. Add a Google Maps API key
The key turns on address suggestions as customers type, and the map. See Get a Google Maps API key.
4. Add the widget to your theme
Add the Shoppy FS - Widget app block to your product page, then save your theme. See Add the widget to your product page.
5. Test on your storefront
Open your online store in a normal browser window, not a private or incognito one, and check:
- Open a product page for a product that has stock in at least one of your locations.
- The Find in Store widget shows each store with the right stock.
- Switch between variants, such as sizes or colours. The stock updates for each store.
- Search for an address, or use your current location. The nearest stores are listed.
- Open a store’s details. The address, phone number, and trading hours are right.
Your free trial
You get a 7-day free trial with every feature. A banner shows how many days are left. Click Choose a plan at any time: your remaining trial days carry over, so you don’t lose them.
If the trial ends before you choose a plan, the widget stops showing stock on your online store. Your settings and locations are kept. Choose a plan in Billing to turn it back on.
Get help
Go to Help in the app menu, or email help@shoppycommerce.com.au. We usually reply within one business day. New customers can also book a free setup session, where our team sets up Find in Store with you. See Getting help.